French Drains to Protect Your Property from Water Damage and 8 Common Mistakes
Water damage is one of the most common and costly threats to a property. Whether it’s stagnant water in the yard or seepage into your basement, the consequences of poor drainage can be severe, affecting everything from your lawn to your home’s foundation. One of the most effective and cost-efficient solutions to these problems is the installation of a French drain system. These systems not only protect your home from water damage but can also increase its resale value by ensuring the integrity of the property is maintained.
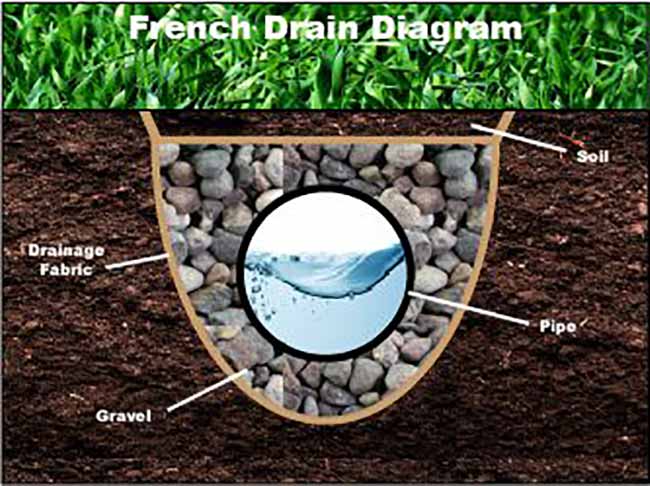
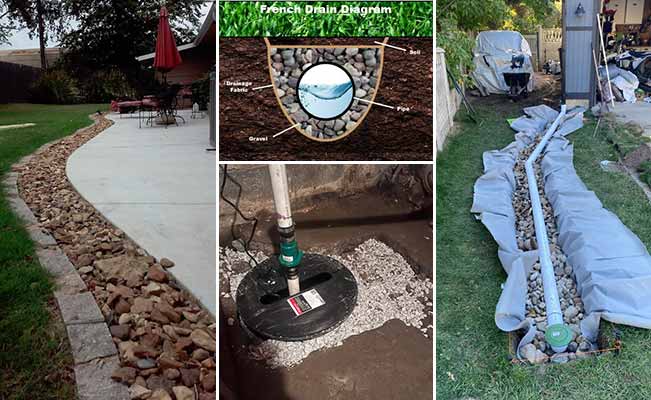
What is a French Drain?
A French drain is a specially designed system consisting of a trench, gravel, and a perforated pipe. The system is designed to divert water away from areas that are vulnerable to flooding or pooling, such as a home’s foundation, basement, or yard. By creating a clear path for water to flow, French drains can effectively alleviate standing water problems and prevent long-term water damage.
image via reddit
French drains are most commonly installed around the perimeter of a home, but they can also be used to address specific water issues in yards or along driveways. A correctly installed French drain ensures that water flows away from critical areas and into a designated drainage space, such as a storm drain or a rain garden.
How Do French Drains Work?

French drains work by relying on gravity and the porous nature of the materials used. The perforated pipe at the center of the system allows water to enter through small holes. As water seeps through the surrounding gravel or stone, it enters the pipe, where it’s channeled away from trouble spots in your yard or home. To protect the pipe from dirt, debris, or plant growth that might block the flow, landscapers often wrap it in landscaping fabric, which keeps the water flowing freely without letting unwanted materials clog the system.
Pros and Cons of Installing a French Drain
Pros:
-
Prevents Water Damage: The primary benefit of a French drain is its ability to prevent water damage. By directing water away from vulnerable areas, it reduces the risk of flooding, basement seepage, and soil erosion.
-
Durability: French drains are built to last, with most systems having a lifespan of 30 to 40 years when properly installed and maintained.
-
Aesthetic Appeal: When installed correctly, a French drain can enhance the appearance of your yard. The trench can be covered with attractive stones or plants, making it blend seamlessly with your landscape.
-
Cost-Effective: Compared to the potential costs of water damage repairs, French drains are relatively affordable and provide long-term protection.
Cons:
-
Labor-Intensive Installation: Installing a French drain is a substantial project that involves digging trenches and laying pipes, which can be time-consuming and physically demanding.
-
Disruption to Existing Structures: You may need to remove or adjust existing structures, such as decks, walkways, or driveways, to make room for the drain.
-
Risk of Clogging: Over time, French drains can become clogged with debris, roots, or soil, potentially causing them to overflow or stop working.
-
Safety Considerations: Installing a drain near underground utilities like gas or power lines requires careful planning and may require professional help to avoid accidents.
When to Avoid Installing a French Drain

image via reddit
While French drains are a fantastic solution for many water drainage issues, there are scenarios where they may not be the right choice:
-
Insufficient Slope: If your property lacks the natural slope needed to direct water away from structures, a French drain might not be effective. Without enough incline, the water could simply pool within the trench, worsening the drainage problem.
-
No Proper Drainage Destination: It’s important that the water from your French drain is directed to a suitable disposal area, like a storm drain or a designated yard area. Draining water into a neighbor’s property is not only impractical but also potentially illegal.
-
Longer Drain Runs: For drains longer than 50 feet, it’s best to consult with a professional. DIY systems may struggle with long distances, which could lead to water backing up or improper drainage.
How Much Does a French Drain Cost?

The cost of installing a French drain depends on several factors, including the size of the system, the complexity of the installation, and whether you hire a professional or do it yourself.
-
DIY Installation: For a DIY project, costs typically range from $1,400 to $5,100, depending on the materials used and the size of the trench.
-
Professional Installation: Hiring a professional contractor can raise the cost to $10,500 or more, especially for larger or more complicated installations. Costs typically break down as follows:
-
Exterior Perimeter Drains: $10-$40 per linear foot
-
Interior French Drains: $35-$110 per linear foot
-
Curtain Drains: $15-$30 per linear foot
-
Trench Drains: $10-$40 per linear foot
-
While the upfront cost may seem high, investing in a French drain is a wise decision when considering the potential cost of water damage repairs or foundation repairs, which can run into the tens of thousands of dollars.
Guide to Installing a French Drain for Effective Drainage
1. Planning and Preparation
The success of a French drain system begins with careful planning and location selection. Identifying areas where water tends to pool or where moisture accumulates, especially after rainstorms, is the first step in this process. The primary goal is to direct water away from your home, ensuring it flows towards a safe outlet such as a storm drain, retention pond, or a designated water disposal area. It is crucial that the water is not redirected onto a neighbor’s property, as this can lead to legal disputes.
Once you have identified the pooling area and the outlet for runoff, mark the proposed path of the trench using spray paint, flags, or stakes. This will help visualize the direction and length of the trench. For optimal drainage, the system must be installed with a slope—usually a 1% decline, which means for every 10 feet of trench, the pipe should drop 1 inch. Additionally, ensure that there are no zoning restrictions in your neighborhood before proceeding with digging and installation. Also, confirm that the water pooling is not caused by underlying issues like damaged pipes that might require separate attention.
2. Digging the Trench
Once the planning stage is complete, the next step is digging the trench. It is essential to dig the trench in the right location and to the right depth. The trench should typically be 18 inches deep and 9 to 12 inches wide to accommodate both the pipe and the gravel layer. The slope of the trench is critical to ensure that water flows properly through the system, guided by the force of gravity.
To dig the trench, you can use manual tools like shovels, but for larger areas, especially those exceeding 100 feet in length or in difficult, rocky soil, using a trencher machine is advisable. Trenchers are designed to create straight, even trenches, making them ideal for long runs. They also help to achieve a smooth bottom that facilitates proper water flow. Before digging, it is essential to check for underground utility lines, such as water, gas, or power lines, to prevent accidental damage during the process.
3. Lining the Trench and Preparing for Drainage
Once the trench is dug, the next step is to line it with a permeable filter fabric. This fabric serves a dual purpose: it prevents soil, debris, and roots from clogging the drainage system while allowing water to pass through freely. Lay the fabric over the gravel bedding at the bottom of the trench, leaving enough excess fabric along the sides to wrap over the gravel layer once the pipe is in place. This step ensures that the system remains clean and functional over time, as soil and debris will be kept away from the pipe’s perforations.

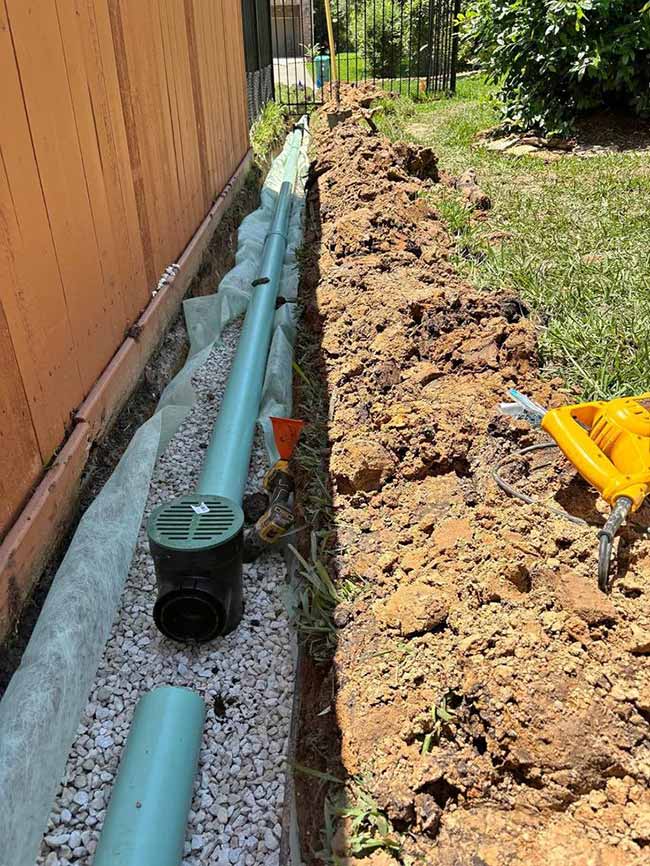
4. Installing the Pipe and Ensuring Proper Flow
With the trench lined and prepared, the next step is to install the perforated drainage pipe. The pipe should be placed on top of the gravel bedding in such a way that the perforated holes face downward. This ensures that water is drawn into the pipe from the gravel layer and guided towards the outlet. The pipe can be extended using additional sections, with the joints secured by fittings to maintain a continuous flow.
For the most durable system, PVC piping is recommended, as it can withstand pressure and weathering better than flexible hoses. When using PVC, it is essential to drill holes at regular intervals (about 6 inches apart) along the length of the pipe to allow water to flow into the pipe system effectively.
5. Gravel and Fabric: Adding Layers of Protection
After the pipe is laid in place, cover it with another layer of gravel or crushed stone. This layer, usually about 3 inches deep, helps maintain the stability of the pipe and facilitates efficient water movement. It is important to ensure that the gravel does not rise above ground level to avoid interfering with landscaping or the surrounding terrain.

Next, wrap the excess filter fabric over the gravel, creating an additional protective layer. This ensures that debris and soil do not infiltrate the drainage system, keeping it clean and functional for years to come.
6. Backfilling and Finalizing the Installation
Once the pipe is covered, the final step is backfilling the trench with topsoil. This will conceal the drainage system while restoring the landscape to its original appearance. Be sure to compact the soil to prevent settling over time, which could lead to improper drainage.
The inlet grate, located at the point where water collects, should be covered temporarily during the backfilling process to protect it from dirt and stones. Once the trench is filled, remove the temporary cover, ensuring that the grate is unobstructed and ready to allow water to flow into the system.
7. Maintaining the French Drain for Long-Term Performance
Proper maintenance is crucial for ensuring the continued effectiveness of your French drain system. Regular checks should be conducted every few months, especially during the rainy season. Inspect the inlet grate to ensure it is not blocked by debris such as leaves, which can obstruct water flow. Additionally, periodically remove the grate and check that the connections and pipe interior are clear of any obstructions.
To further test the system’s functionality, pour water into the inlet grate and monitor the flow through the pipe to ensure that the water reaches the outlet point without any issues. Regular maintenance will help prevent costly repairs and ensure that your French drain continues to protect your property from water damage.
DIY French Drain With PVC Pipe
8 Common French Drain Mistakes & How to Avoid Them

image via reddit
Throughout our work with homeowners and contractors, we’ve encountered many issues related to French drain installations. Many of these problems come from simple but costly mistakes. To help you avoid these pitfalls, here are eight of the most common mistakes made when installing French drains and how to fix them.
1. Failing to Check for Underground Utilities Before Digging
One of the most common errors made during trenching projects is failing to check for underground utilities. While it may seem like an obvious step, it’s easy to assume that there are no buried utilities in your yard, especially if you’re digging in the back or side yard. However, striking a power or gas line while digging can be extremely dangerous and costly to repair.
The best course of action is to contact your local utility service before starting any digging project. Many regions have a dedicated service to send utility companies to mark the locations of underground utilities, ensuring you can dig safely. Additionally, always check for any local restrictions or regulations from your homeowner association that might affect where and how you can install a drainage system.
2. Choosing the Wrong Type of Drainage Rock
The material used for the drainage rock is critical for proper water flow. The right rock should be clean, round, and have enough space between the pieces to allow water to move through freely. A great option for drainage fill is 1-1/2″ clean, round rock.
Small pea gravel should be avoided as it creates tighter gaps between the stones, restricting water flow. Crushed rock is also not ideal because it compacts over time, clogging the system. If you can only access crushed rock, make sure to wrap the drainpipe in a mesh sock. This will prevent fine particles from the crushed rock from entering the pipe and causing blockages.
3. Not Using Drainage Fabric to Line the Trench
Another major mistake is skipping the drainage fabric when installing your French drain. This fabric plays a crucial role in keeping soil and debris out of your rock fill while allowing water to flow through the system. Without it, dirt will mix with your rock, which will eventually clog the system and reduce its efficiency.
To prevent this, always line your trench with non-woven geotextile fabric. This fabric will act as a barrier to prevent soil from contaminating your rock fill while still allowing water to pass through. A high-quality, non-woven geotextile fabric can last for decades and will help keep your drainage system functioning for many years.
4. Using the Wrong Type of Landscape Fabric
Not all landscape fabrics are created equal, and using the wrong one can lead to drainage issues. The two main types of landscape fabric are woven and non-woven fabrics. For drainage purposes, you need a non-woven fabric that allows water to flow freely while keeping soil and debris from entering the system.
Woven fabrics are strong but do not offer the same level of water permeability, which is why they are unsuitable for French drains. To ensure effective water drainage, always use a non-woven drainage fabric with a weight of 4 to 6 ounces per square yard. This will provide the best balance of strength and water flow.
5. Returning Excavated Soil to the Trench
Sometimes, contractors or homeowners make the mistake of putting the excavated soil back into the trench after installing a French drain. While it might seem easier, this can cause major issues.
The purpose of installing a French drain is to improve drainage in the area, and adding soil back into the trench defeats that purpose. Soil, especially clay, can clog the system and prevent water from flowing properly. Once the soil is removed, it should not be replaced, as this can reduce the capacity of the drainage system and lead to failure over time.

image via reddit
6. Not Ensuring the Proper Slope of the Drain
One of the most important aspects of installing a French drain is ensuring that the pipe has the correct slope. A drain that is too flat or has dips can result in water pooling, which will reduce the system’s effectiveness.
Standing water in the drain can also attract tree roots, which are known to block the system and damage the pipes. The ideal slope for a French drain is greater than 1%. This ensures that water will flow freely and naturally away from your home, keeping the system working as intended.
7. Skipping the Drain Pipe
Some homeowners make the mistake of installing a French drain without a pipe. Without a drain pipe, the system cannot handle the volume of water it needs to. A French drain without a pipe is essentially ineffective at diverting water, which will lead to pooling and possible water damage to the surrounding area.
Make sure to install a perforated pipe, typically 4″ or 6″ in diameter, surrounded by drainage rock to ensure that the system can handle large amounts of water and direct it away from your property.
8. Directly Connecting Downspouts to the French Drain
It’s not uncommon to connect gutter downspouts directly to a French drain, but this can overwhelm the system during heavy rain. The drain can become flooded with too much water, which might cause it to fail.
To prevent this, install a catch basin before the French drain and connect the downspouts to the basin. This will give the system time to handle the water before it enters the drain. The catch basin will also act as a point of access for cleaning out debris, such as leaves, which can clog the drain if they are allowed to enter the system.
DIY French Drain: My Journey to Fix the Pooling Water Problem
So, I’m about to embark on a DIY French drain project. Honestly, I’ve never been good at manual labor, and when it comes to digging trenches and working with gravel and pipes, I have no idea what I’m doing. But after getting a landscaping estimate of over $3,000 to fix the drainage issue at the bottom of my driveway, I figured, “Why not try this myself?” How hard can it be, right?
The Problem: Pooling Water at the Driveway Corner
Every time it rains or when the snow melts, water collects in a big puddle at the corner of my driveway. It’s been like this ever since we moved into the house two years ago. After dealing with this frustration for so long, I finally decided it’s time to fix it for good. My research pointed me toward one solution: a French drain.
The area where the water pools is located at the bottom of my driveway, right near the corner. Beyond that corner is a steep drop into a wooded valley, so water naturally flows in that direction. My plan is to dig a trench along the bottom of the driveway, extending toward the corner, and have the French drain guide the water through the yard and into the valley. Think of it as creating a “T” shape—one part running along the driveway and the other part leading into the valley.
I also want to install a visible drain grate at the corner of the driveway to catch water during heavy storms. This will help ensure the water doesn’t continue to pool at the same spot. But, of course, this is all just a plan from someone who has no experience in drainage systems, so I’m definitely open to advice.
The Dilemma: Traditional Gravel and Pipe vs. Pre-Wrapped Pipe
Now, I’ve done my homework, looking through tutorials on YouTube and reading guides online, and I’ve found two main ways to go about this:
-
Traditional Gravel and Pipe Method: The classic DIY approach involves digging the trench, laying down gravel, and installing a perforated pipe (you can easily find these at stores like Lowe’s or Home Depot). The process looks relatively straightforward. But I’ve heard that if the pipe is not properly wrapped with fabric, dirt and debris can clog the perforations over time, leading to drainage issues down the road. Still, this method seems like the cheaper option.
-
Pre-Wrapped Pipe System: Then, I came across a prefabricated French drain system that comes with a pre-wrapped pipe. The idea behind this system is that it’s much easier to install. You just dig a trench, lay the pre-wrapped pipe, and cover it with soil. Simple, right? The catch is, it costs about five times as much as the traditional method. However, the reviews for these systems are glowing, with many people saying it saves time and reduces the risk of future clogs.
Is It Worth Spending Extra on Pre-Wrapped Pipe?
This is where I get a bit torn. On one hand, the pre-wrapped system seems super convenient. No need to wrap the pipe in fabric, no risk of clogging from dirt and debris, and the installation seems quick and hassle-free. But then again, it’s so much more expensive. I’m really trying to save money on this project, and the traditional gravel and pipe setup would be much cheaper. So the big question is: Is the convenience of the pre-wrapped pipe worth the extra cost?
From what I’ve gathered, the pre-wrapped pipe definitely offers long-term benefits. The protective fabric around the pipe keeps it clean, reducing the chances of clogging and improving the system’s overall efficiency. If you’re planning to install the drain once and forget about it for years to come, the extra investment might be worth it. However, if you’re just trying to fix a small, low-maintenance problem and want to keep the budget tight, the traditional gravel method should work just fine as long as you install it properly and check it occasionally.
Could I Mix Both Methods?
I also had another thought—what if I use the pre-wrapped pipe just for the section along the driveway and then use regular perforated pipe for the part that runs through the yard and into the valley? I mean, it seems like it could work, right? The driveway area gets more traffic, and I’d want that section to be as durable and clog-resistant as possible. But the rest of the yard, where there’s less water flow, could probably do with a cheaper, regular pipe.
This is where things get a bit tricky. While it’s possible to mix both types of pipe, I’ve read that the transition between the pre-wrapped pipe and regular pipe could lead to issues if not properly connected. The water flow might not be as smooth, and debris could accumulate where the two pipes meet, causing potential clogs in the future. So, while mixing pipes is an option, it might not be the most reliable in the long run.
Conclusion: Is This DIY Project Worth It?
After considering all these options, I’m leaning toward trying the traditional gravel and pipe method for the French drain. Sure, it might require a bit more effort, but it’s a cost-effective solution. Plus, if it doesn’t work as expected, I’m not out a huge amount of money. On the other hand, the pre-wrapped pipe system definitely offers convenience and peace of mind, so if you have the budget for it, it could be a worthwhile investment.
In any case, I’ll be documenting my progress, so stay tuned for updates! And if anyone out there has experience with French drains or any advice, I’d love to hear from you—especially if you’ve used both systems and can share your insights!