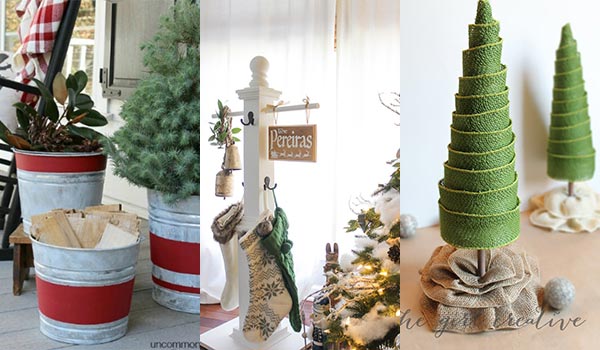
Best 15 Clever DIY Carport Ideas
You know the saying that goes “The day you wash your car is the day it finally rains” ? Do you find it annoying when, it the winter, you are about to go to work but your car windshield has frosted over and you must scratch it ? A simple DIY carport can help shield your vehicle from rain, snow, frost, and even hail—especially if you don’t have a garage. They are not very difficult or expensive to make either, so if you are considering one, you might as well do it yourself.
Why Do it yourself ?
As previously mentioned, a carport is not terribly difficult to make or expensive to do: of course, if you don’t have the time or if you don’t mind spending the money absolutely get a professional to do it for you; but if you’d rather save money building your own diy carport will not only be cheaper but it can provide a fun and entertaining enterprise to keep your evenings occupied. And let’s be honest—there’s something seriously satisfying about stepping back and saying, “Yep, I built that.”
DIY Carport ideas:
A diy carport can be as simple, or as complex, as you want to make it. A couple wooden beams for structure, a couple pallets for a roof and a water-resistant cloth or some plastic will make for a really simple, budget friendly yet effective carport. If you’ve got the space, a shipping container can double as a side wall. Just add a few beams and an aluminum sheet on top, and you’re good to go.
You can use recycled pvc pipes, wood and plastic to buy a “greenhouse style carport” that will not only keep your car protected but also double as a greenhouse when not in use ! With a little bit of time and some extra materials, you can build a lovely, elegant, professional carport that is attached to your house. All in all, the possibilities are endless as long as you have time and imagination. Have fun creating a carport with your own hands !
#1. Create a solid carport with metal structure and glass roofing:
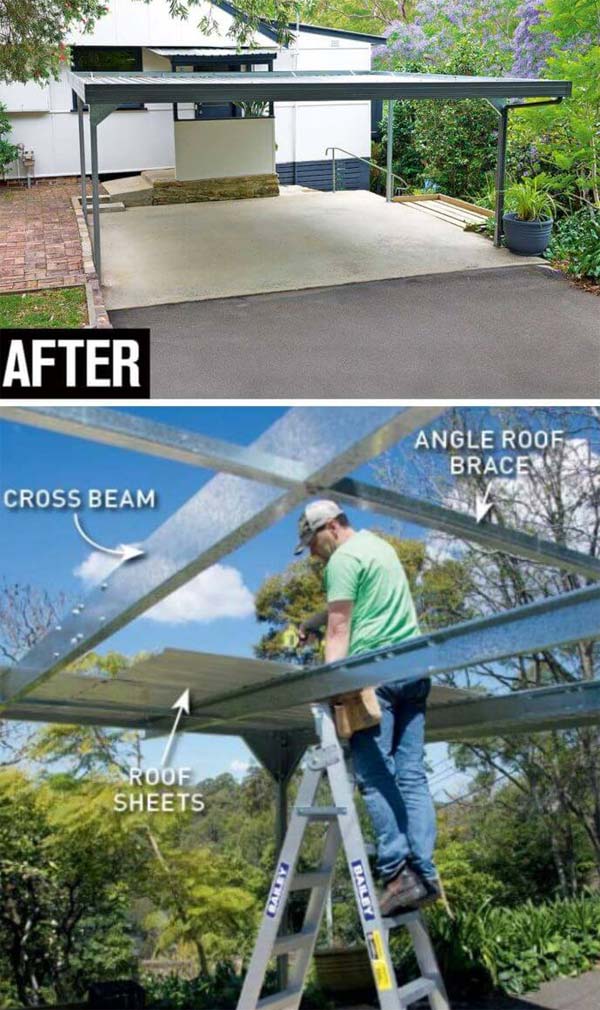
Looking to create a sturdy DIY carport? One brilliant idea is to construct a DIY car shelter with a metal structure and glass roofing.
This DIY carport not only offers robust protection for your vehicles but also adds a touch of elegance to your outdoor space.
Tutorial: handyman.net.au
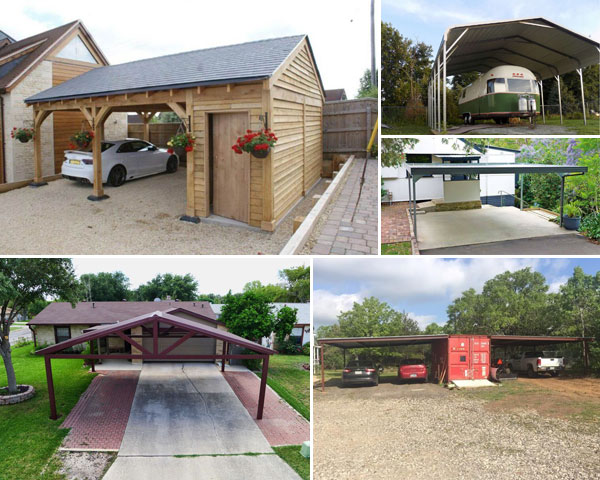
#2. Use a shipping container to build a carport along with a neat storage unit:
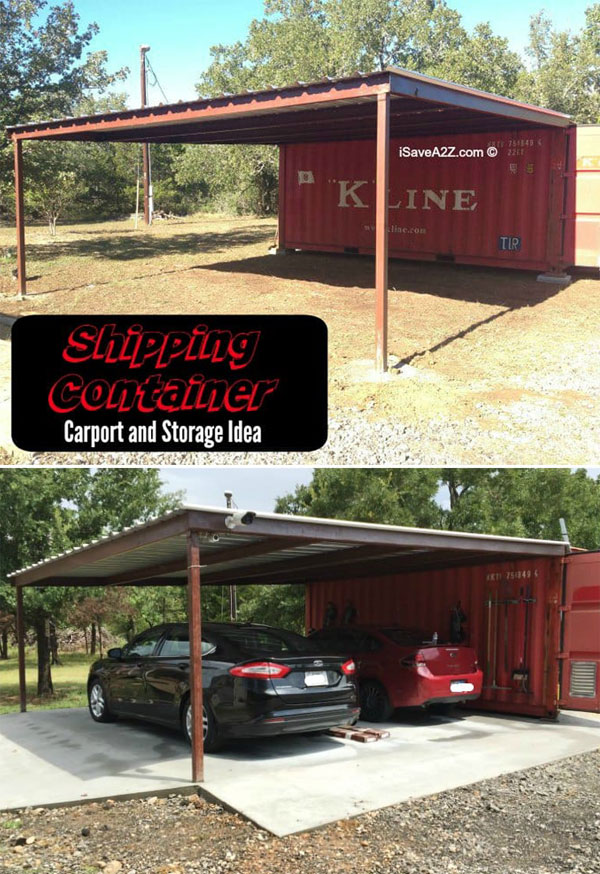
Want an affordable carport solution that’s also practical for storage?
Try using a shipping container in your DIY carport project.
With the right DIY carport kit, you can transform a shipping container into a budget-friendly carport and storage unit, saving you both time and money.
Tutorial: isavea2z.com
#3. Build DIY Carport using Pallets, and Cover the roofing with metal sheet:

Need an economical carport option? Learn how to build a cheap carport using pallets for the structure and metal sheets for roofing.
It’s a clever, low-cost way to shelter your car while putting old materials to good use.
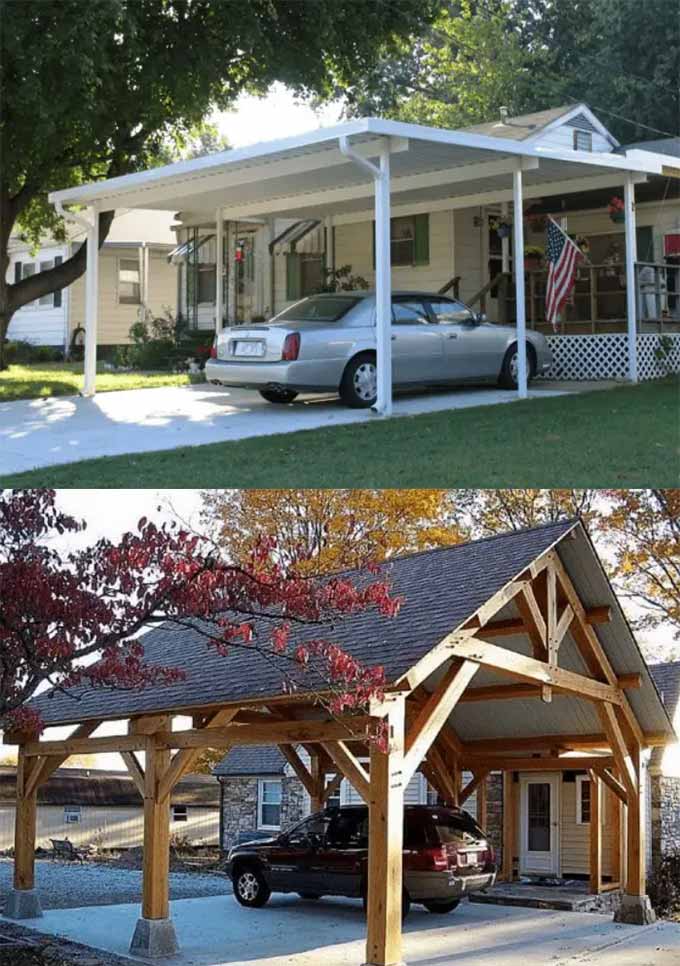
#4. Install the attached wooden carport that will provide the perfect shelter to your vehicles:
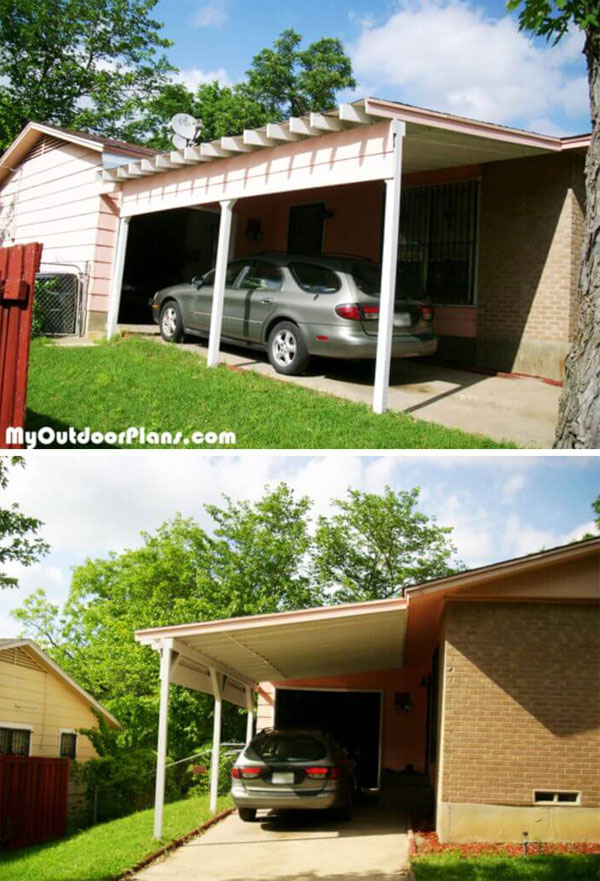
Looking for carport ideas that seamlessly blend with your home?
Consider installing an attached wooden carport.
This practical addition not only provides optimal shelter for your vehicles but also enhances your house’s overall curb appeal.
When it comes to carport ideas attached to the house, this one combines functionality and aesthetics seamlessly.
More details at: myoutdoorplans.com
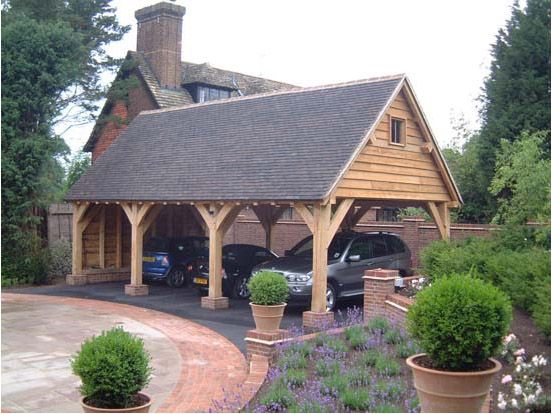
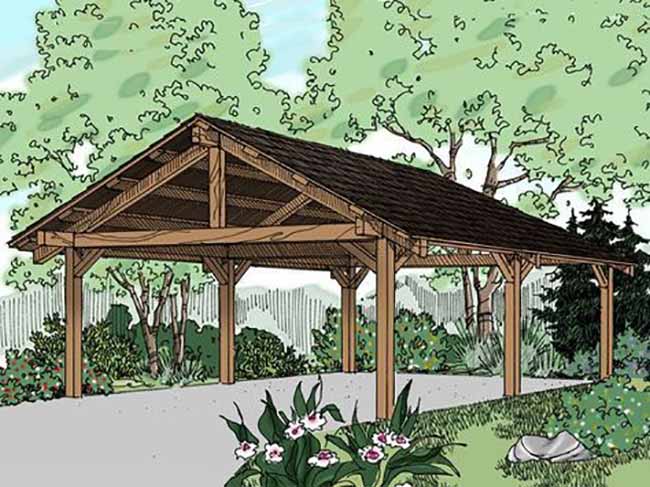
#5. Build a double carport that is looking lovely and comes with bungalow style chevron roof:
Want to make a statement with your carport?
Explore carport design ideas like building a double carport with a charming bungalow-style chevron roof.
These creative carport designs offer shelter for two vehicles and give your property a distinctive and stylish touch.
Tutorial: howtospecialist.com
#6 How to Build a Sturdy Attached Carport (With Full Guide)
If you’re looking to add an attached carport to your home, look no further! This comprehensive guide includes detailed pictures, a material list, and step-by-step instructions to make the process as easy as possible. Consider different carport ideas and styles to complement your home’s architecture and provide convenient protection for your vehicles. See detailed plan ===> gardenplansfree.com
Low-Cost Car Canopy
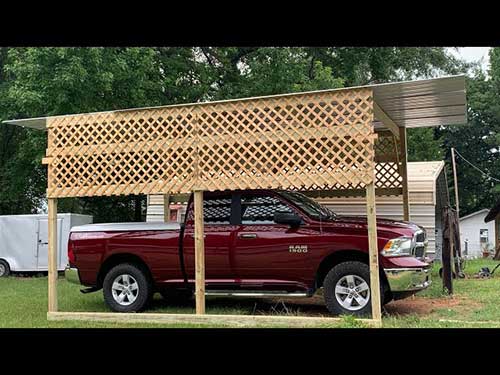
For this DIY carport, gather a few pieces of wood and support poles, plus roofing tin and lattice panels.
Quickly build this budget-friendly DIY carport as a versatile outdoor structure on your property.
Building this affordable carport yourself not only cuts costs but also adds a practical element to your outdoor space. Video tutorial here.
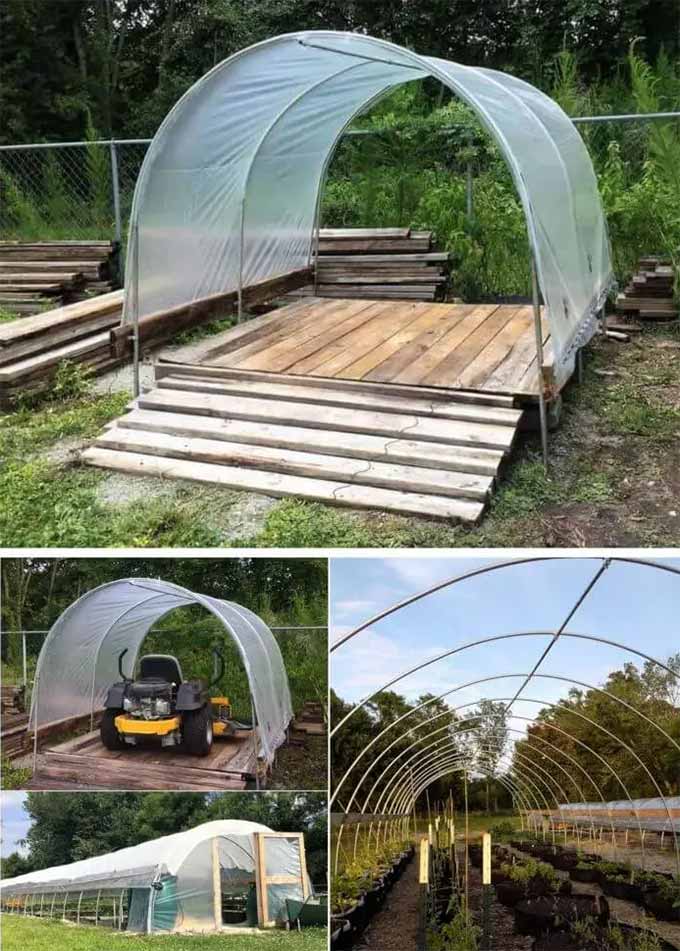
Solar Garden Carport
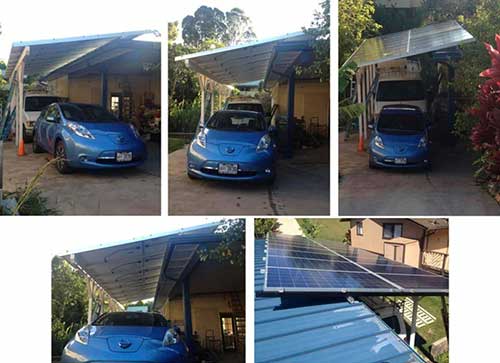
Picture a car shelter that protects your vehicle while incorporating a solar system, water catchment system, and space for growing food, all within a small area.
It may seem challenging, but with this DIY carport plan, it’s achievable. The free plan guide you on building a multifunctional, affordable, and portable carport.
By following this plan, you ensure your vehicle’s safety and contribute to a greener, more self-sufficient lifestyle.
#7 The Cozy 3-Car Carport
This carport is a great choice for families with multiple cars or outdoor enthusiasts who need to protect their toys. With space for three vehicles and a charming log cabin feel, it’s sure to make a statement in your backyard.
Although there may not be a step-by-step tutorial available, let your creativity flow and explore different carport ideas to design your perfect space. Consider adding an attached carport to your home for added convenience and accessibility.
#8 Build a Budget-Friendly Canopy Carport
Don’t let a tight budget stop you from protecting your vehicles! This easy-to-build, cheap canopy carport uses recycled wood and leftover PVC pipes for a durable and long-lasting solution.
Perfect for garden vehicles or as a temporary shelter, this DIY project is both functional and affordable.
#9 Shed & Carport
#10 How To Make A Homemade Carport Cheap
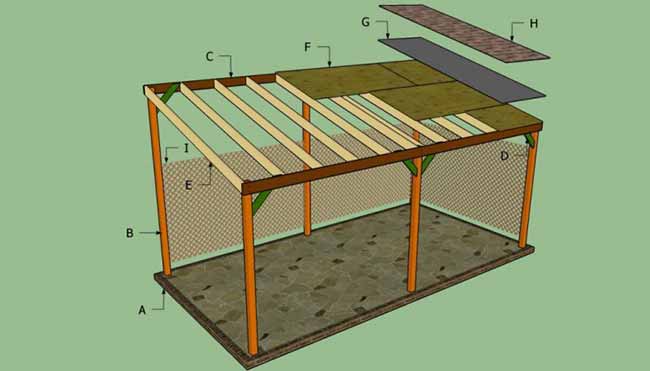
Materials You Will Need to Create Your DIY Carport
Building your own carport? Here’s what you’ll need—don’t worry, most of it is easy to find at your local hardware store.
- Posts: You’ll need strong lumber or metal to make your posts, which will hold up your support beams.
- Support beams: Four 2×6 boards should be enough to hold the roof nice and steady.
- Roof panels: The top of your carport can be made from a variety of materials, such as wood, plastic, corrugated metal, or galvanized metal roof panels.
- Concrete mix, gravel, and metal anchors: You’ll need these to secure your support beams in the ground.
- Braces: These are short pieces of wood that will provide extra stability by attaching your support beams to your posts. You’ll need two braces for each post.
- Hardware: Pilot screws will be necessary to fasten your pieces of lumber together.
- Sealant: Make sure to weather-proof your carport by using caulk or other sealants to fill any gaps.
- Gravel and shovel: You’ll need to level out the ground with gravel and a shovel before starting construction.
With these materials in hand, you’ll be well on your way to building a functional and stylish carport to protect your vehicles from the elements.
11. Upgrade Your Carport with a Stylish Garage Door

Enhance your carport by adding a functional and stylish garage door.
A mechanical sliding gate can provide security and convenience, automatically opening and closing as your vehicle enters or exits.
This upgrade not only improves the look of your carport but also protects your car from the elements and potential theft.
With various design options available, you can choose a garage door that complements your home’s style while increasing its overall value.
12. The Simple Yet Practical Wooden Carport
This wooden carport features a unique slanted roof, giving it a modern and eye-catching look.
Designed for a single car, it offers shelter from sun, rain, and snow, but with a few adjustments, you could modify it to accommodate additional vehicles.
What makes this carport especially appealing is that it comes with a complete set of plans, including a detailed materials list and step-by-step instructions.
Whether you’re a seasoned builder or a beginner, this project is easy to follow and rewarding to complete. Check out this carport
13. The Spacious and Elegant Wooden Carport
If you’re looking for a carport that balances practicality with aesthetic appeal, this wooden design is a fantastic choice.
With enough space for multiple vehicles, it provides excellent protection while maintaining a clean, elegant look.
The design is simple yet refined, making it a great DIY project for homeowners who want to enhance their property’s functionality and curb appeal.
Its open structure ensures proper ventilation while keeping your cars sheltered from harsh weather.
Whether you need extra parking or a covered workspace, this carport is a versatile addition to any home. Check out this carport
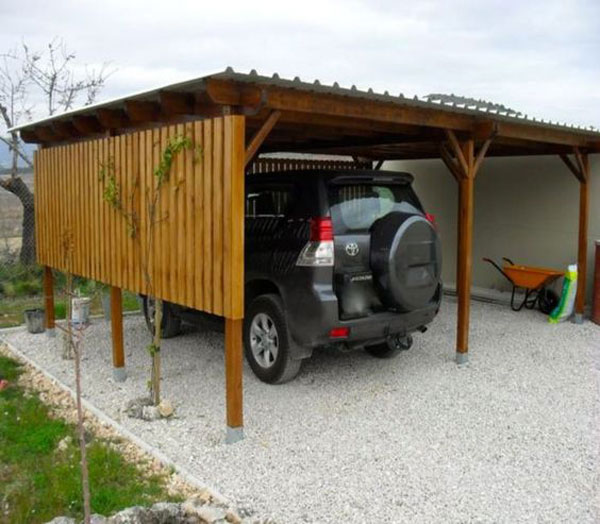
14. The Lean-To Carport: A Smart Space-Saving Solution
This lean-to carport design is a great choice for homeowners with limited space.
Attached to an existing structure, it maximizes available room while providing sturdy protection for your vehicle.
Unlike other designs, this option comes with a full set of building plans and a detailed materials list, ensuring a smooth and efficient construction process.
By combining these resources with real-life examples, you can build a durable, visually appealing carport that blends seamlessly with your home.
Whether you’re an experienced DIYer or a first-time builder, this project offers a practical and stylish way to expand your covered parking space. Check out this carport
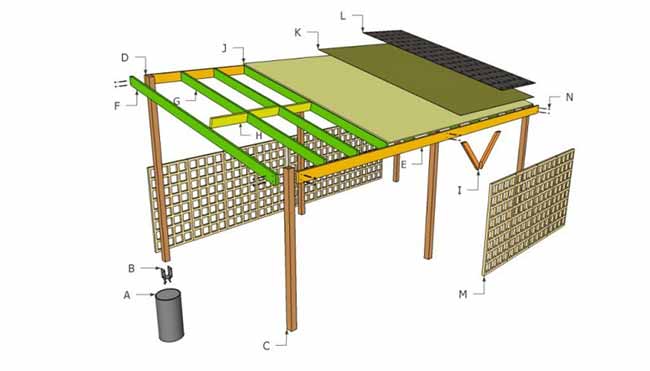
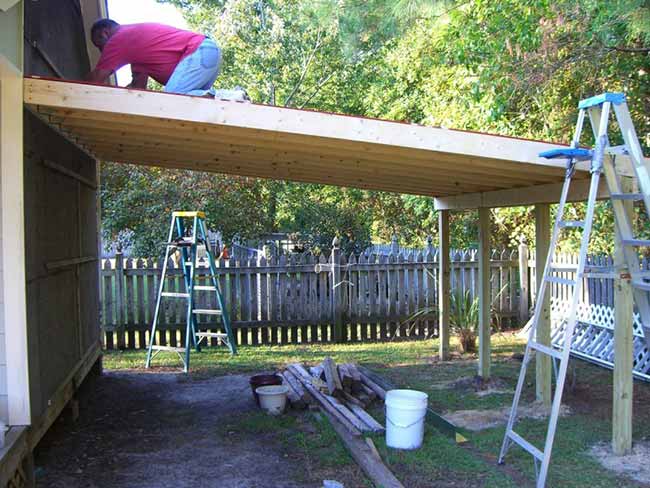
DIY Carport: How to Build a Freestanding Carport
- Determine carport dimensions: Decide on the size of your carport based on your needs. A standard single carport is typically 16 feet long by 9 feet wide, but larger dimensions will be needed for a two-car carport or an RV carport.
- Excavate post holes: Use a shovel to dig six holes for your posts, two feet deep. In windy areas, make the holes four feet deep.
- Secure posts: Insert six 4×4 posts into the holes with metal anchors attached. Fill each hole with gravel and pour concrete to create the post footers. Allow the concrete to harden for a full day before proceeding.
- Attach support beams: Fasten 2×6 pieces of wood to the tops of the support beams to create the frame for your carport. Secure the beams to the six support posts using screws and make sure everything is level.
- Build the roof frame: Attach six 2×4 rafters to the top of the end support beams. Place the front and back two rafters flush against the support beams, and place the remaining four equidistant from each other along the length of the structure to connect the two lengths of support beams. Then add 12 braces (two for each post) at 45-degree angles to connect the support beams to the posts. Caulk any seams in the roof and stain or paint the exposed wood to finish the carport.
This wooden carport offers a simple and natural design that provides shelter while adding a rustic touch to your yard.
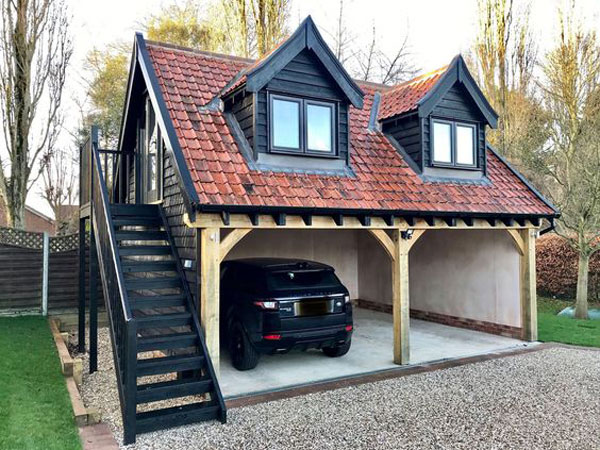
Featuring a cozy upper level, this carport is both practical and stylish, offering extra space with its charming bungalow-style roof.
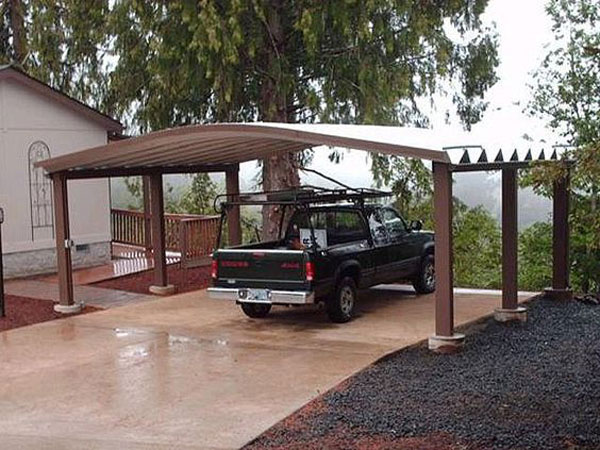
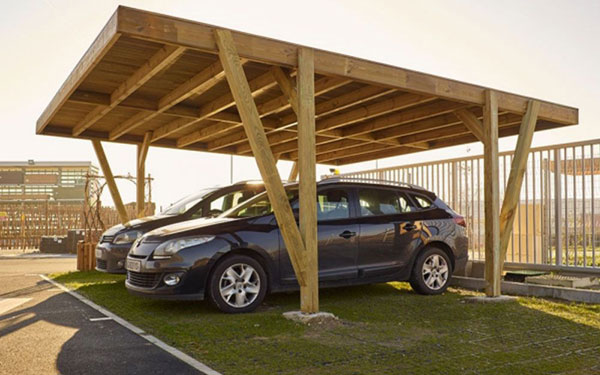
A sleek, metal carport with an arch roof design, providing solid protection with a modern, minimalist look.
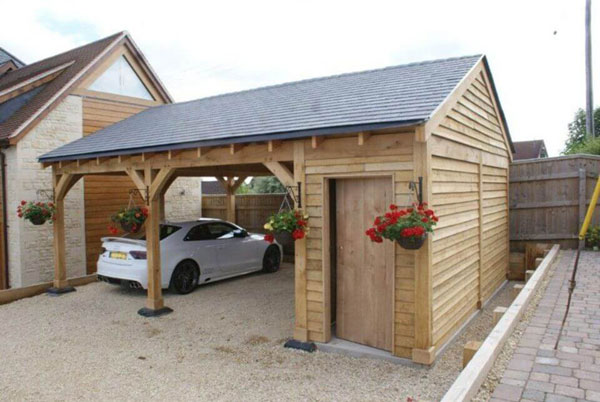
Choosing the right material for your DIY carport depends on your space, your budget, and how much effort you’re willing to put in. Here are a few go-to options that work well for most setups:
Wood: Wood’s a classic—it’s sturdy, easy to work with, and looks great. Just be mindful of where it comes from. If you can, go for reclaimed wood or sustainably sourced lumber to keep things eco-friendly. Bonus: it’s usually easy on the wallet too.
PVC: PVC is a budget-friendly, low-maintenance pick. It’s super light, stands up well to the weather, and doesn’t need a ton of tools to install—perfect if you’re new to the DIY game.
Iron: Want something heavy-duty? Iron’s the way to go. It’s tough, weather-resistant, and will probably outlive your car. Just be ready for a bit more lifting and tools.
Scrap Materials or Prebuilt Structures: Got leftover wood or old parts lying around? You can totally build a carport from scrap materials or even repurpose a prebuilt structure. It’s budget-friendly, eco-conscious, and lets you get creative with what you already have.
In the end, it comes down to what matters most to you—price, look, durability, or all three. Pick the material that fits your goals, and you’ll end up with a carport that’s both useful and satisfying to build.
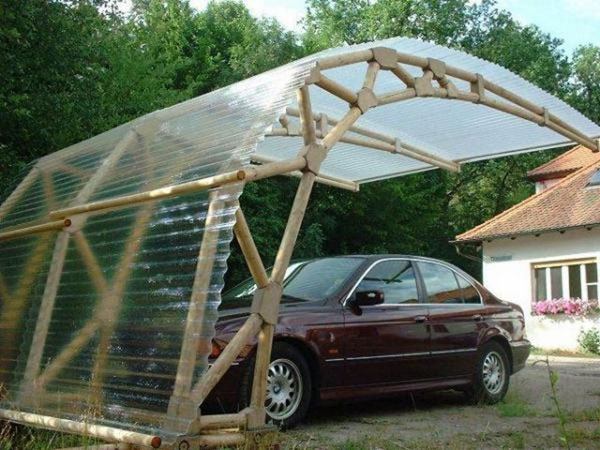
This wooden-framed carport with a transparent roof offers great shelter while allowing natural light to filter through.
A spacious metal frame carport that combines simplicity and durability for excellent vehicle coverage.
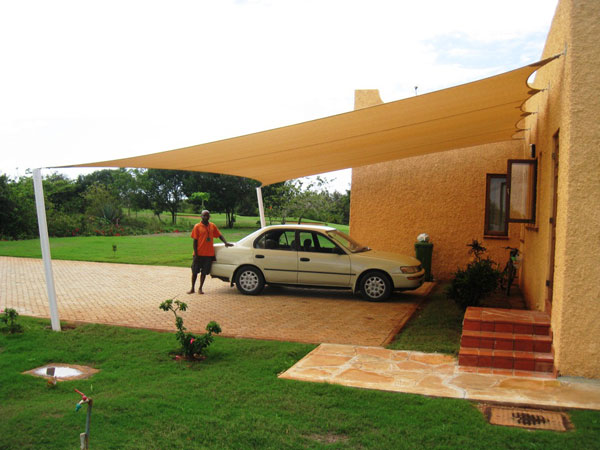
This shade sail carport provides effective sun protection with its clean lines and modern fabric design.
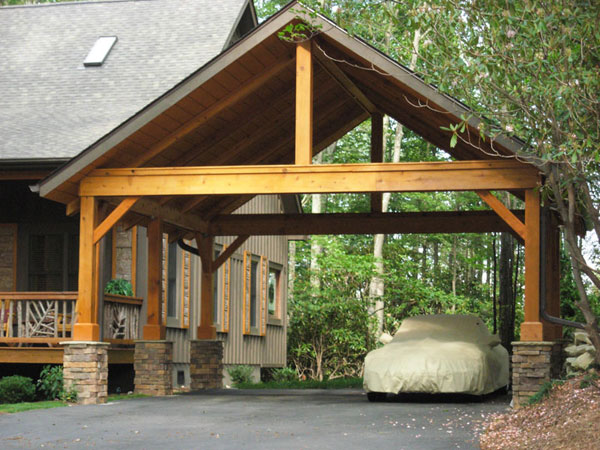
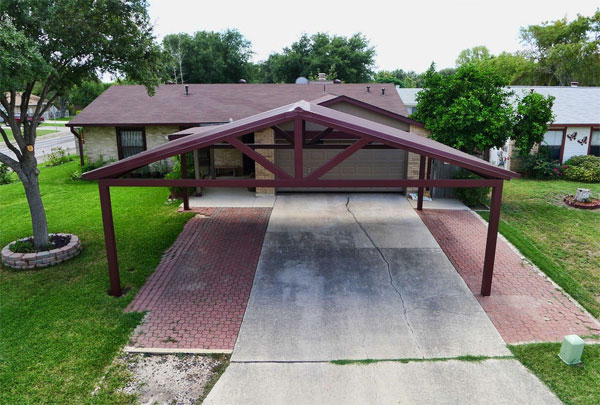
A wooden-framed carport with a gabled roof, blending rustic charm with practical vehicle shelter.
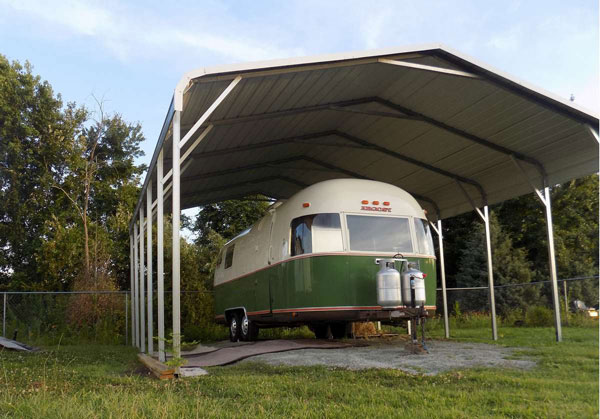
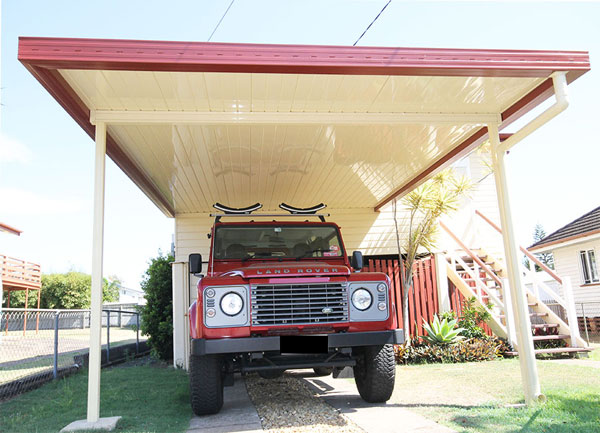
This metal roof carport is perfect for larger vehicles, offering ample shelter with sturdy, long-lasting protection.
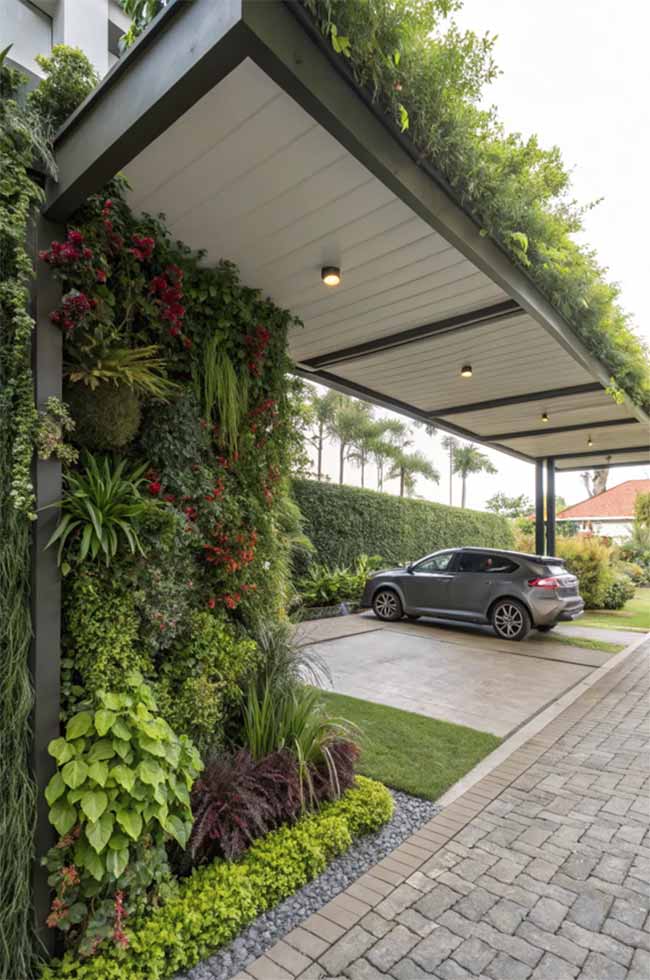
This modern carport is enhanced with a living green wall, adding a touch of nature while providing shelter for your car.
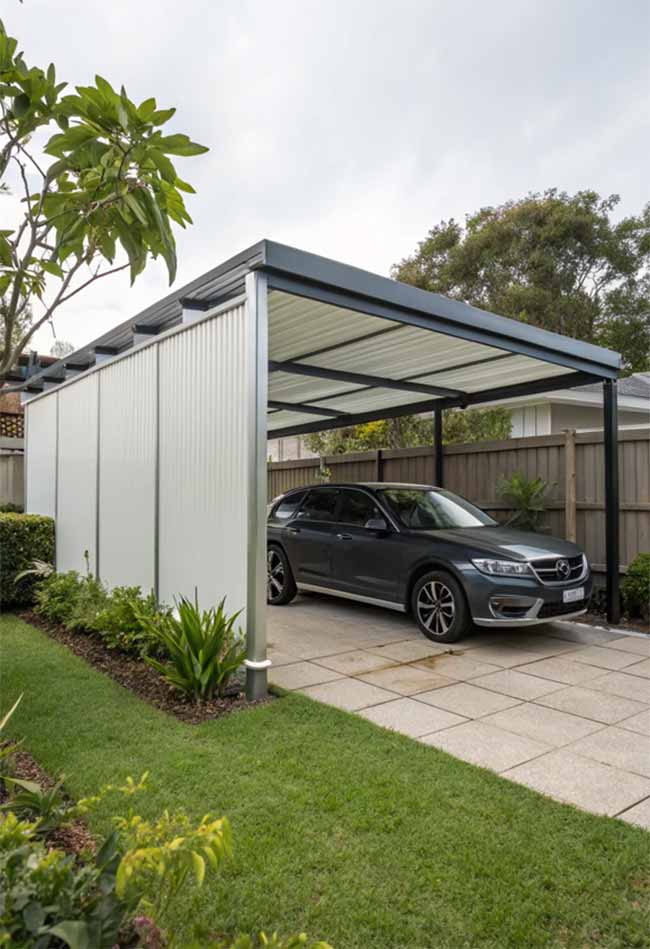
A clean, practical design featuring a sturdy metal frame and simple, enclosed sides that offer reliable protection for your vehicle.
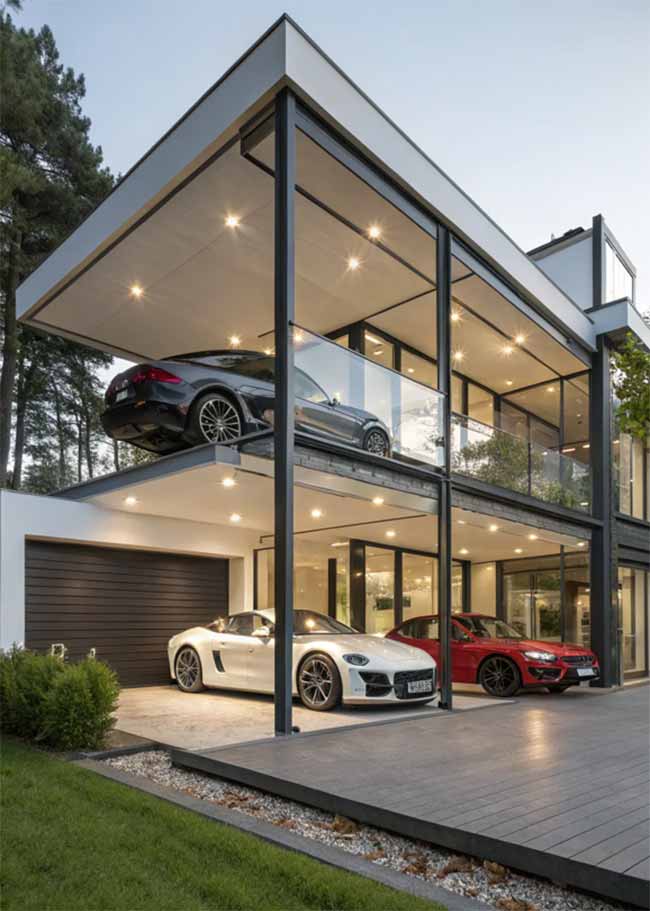
This sleek, multi-level carport combines luxury and functionality, providing a sophisticated solution for parking multiple vehicles.