17 Cool Ways to Decorate Your Flower Pots
Flowers and decorative plant pots are an essential part of every home, as they bring beauty and positive energy. Unique and artistic flower pots can greatly enhance the charm of your plants. If you are looking for pot decoration ideas, there are many creative ways to dress up plain containers like terracotta pots. For those who love DIY, creating their own decorative flower pots is a great way to add a personal touch to their space, both indoors and outdoors. However, if you have bought a number of terracotta pots for your flowers but don’t like their original color, you may want to consider decorating them. Decorating terracotta pots or other plain containers is actually quite easy, and there are many different creative ways to do it! Take a look at some of these ideas:
#1 The Clay Pot Wrapped in Wooden Bark for a Rustic Look
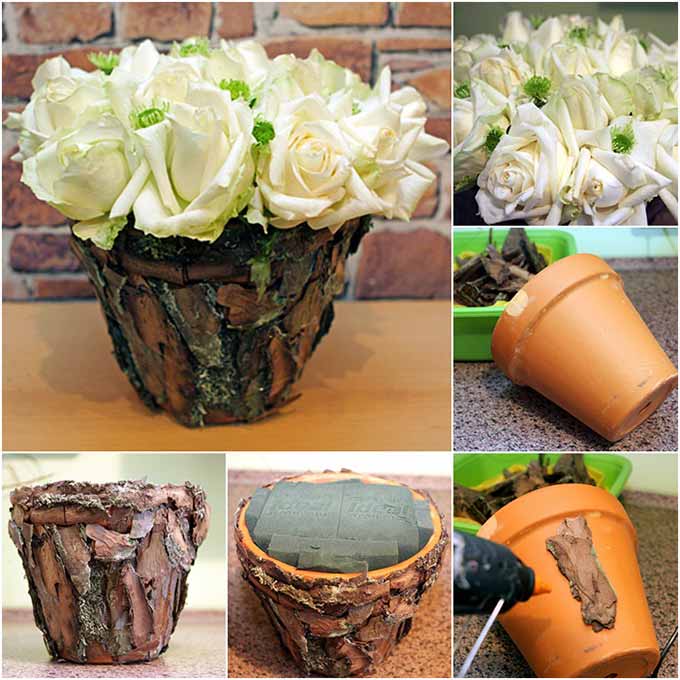
Transform a plain clay pot into a rustic piece with wood bark. Collect wood bark of different sizes and shapes. Using glue, attach the wood bark pieces onto the surface of the pot, covering it completely. Source: diy-enthusiasts.com
#2 Marble your boring flower pots with your old nail polishes:
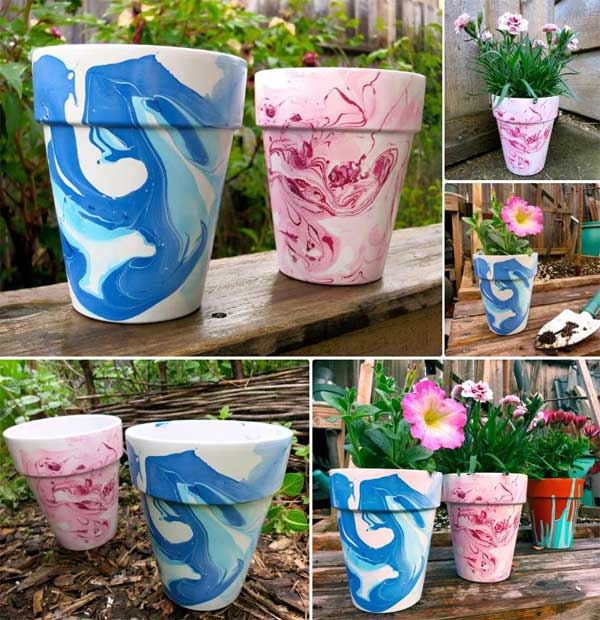
It will show you how to decorate a flower pot using old nail polishes. First, clean the flower pot and paint a base coat. Once it’s dry, you can start dripping the nail polishes onto the pot. Tilt the pot to create a beautiful marbling effect. Let the pot dry and add another layer if necessary. Tutorial: instructables.com
Related: Top 30 Stunning Low-Budget DIY Garden Pots and Containers
#3 Turn a plain terra cotta flower pot into a cute fairy cottage.
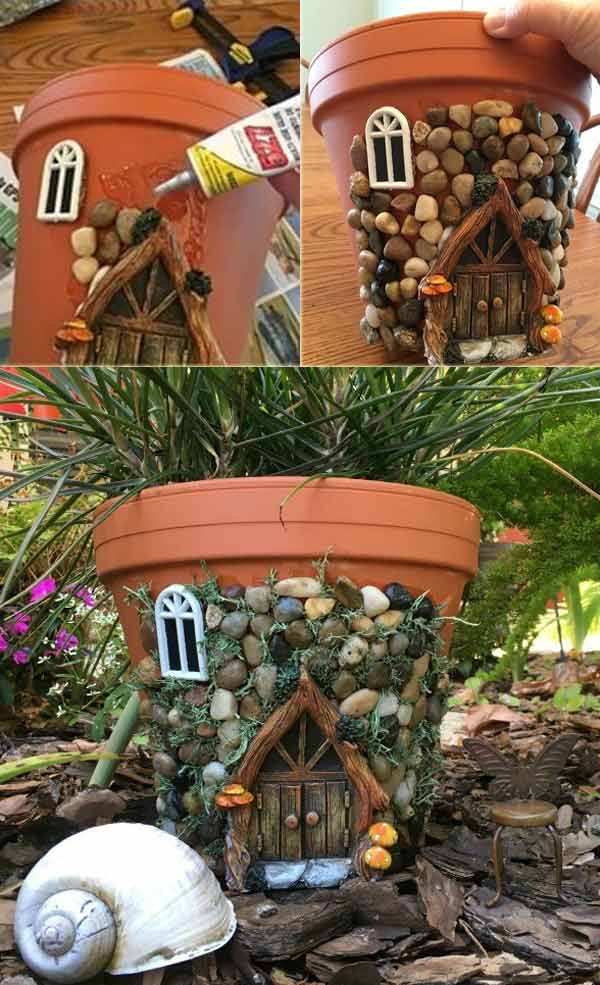
This tutorial will guide you through the process of decorating plant pots to make a whimsical fairy house planter. Firstly, you will need a terra cotta pot, rocks, green reindeer moss, and miniature fairy house accessories. Start by decorating the exterior of the pot with rocks, which can be glued using Gorilla glue for a natural-looking effect. Then, cover the rocks with green moss to create a lush environment for the fairy house.
The next step is to add miniature fairy house accessories such as a fence, furniture, and a roof made of bark or leaves. Finally, place your beautifully decorated planter in a shady spot and enjoy your new fairy garden. All the materials used for decorating plant pots, including the rocks and moss, were purchased inexpensively from the dollar store.
See the tutorial: lifecreativelyorganized.com
#4 Upcycle Your Pots with Seashell Decorations
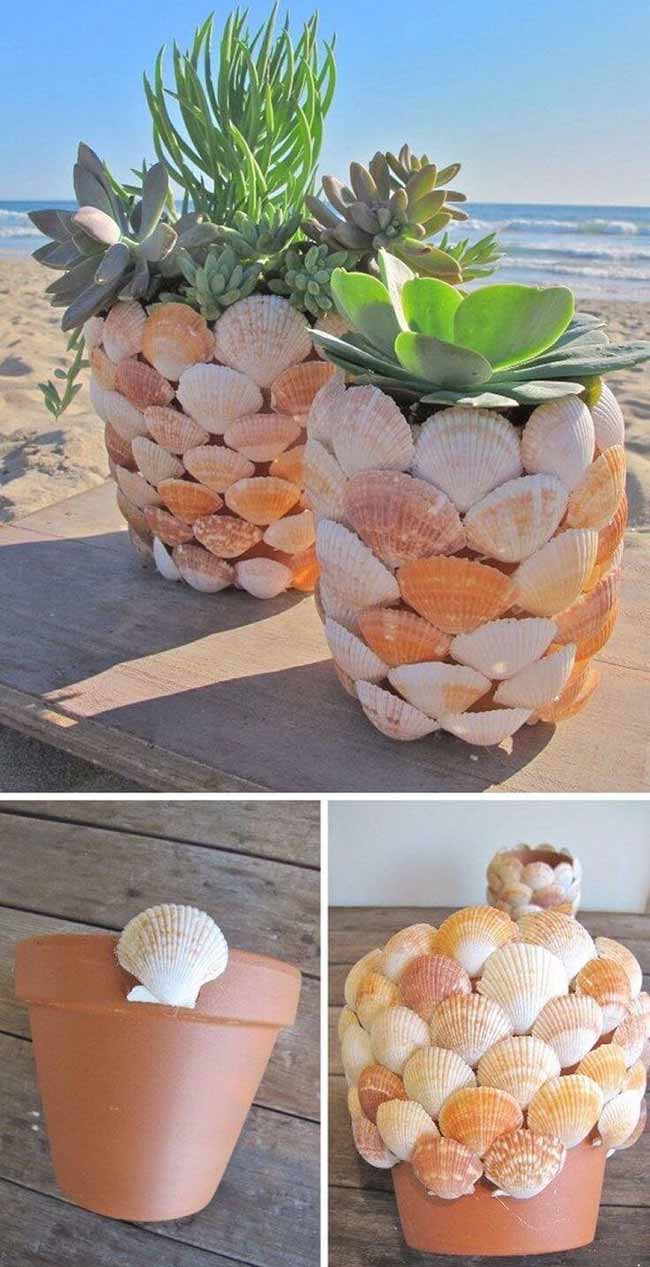
Looking for a creative way to give your ordinary-looking pots a distinct look? Try decorating them with sea shells! Take a walk on the seashore and collect some sea shells of different shapes and sizes. Clean them thoroughly to remove any dirt or sand. Next, take a pot or container and apply a layer of glue or decoupage medium to its surface. Start attaching the sea shells to the pot, making sure to cover it completely. You can either arrange the shells in a pattern or randomly place them for a more natural look. DIY Project Details: us.billabong.com
Related: 15 Cutest DIY Planter Box Ideas to Beauty Your Home
#5 Upcycling Milk Cartons into a Rustic Planter
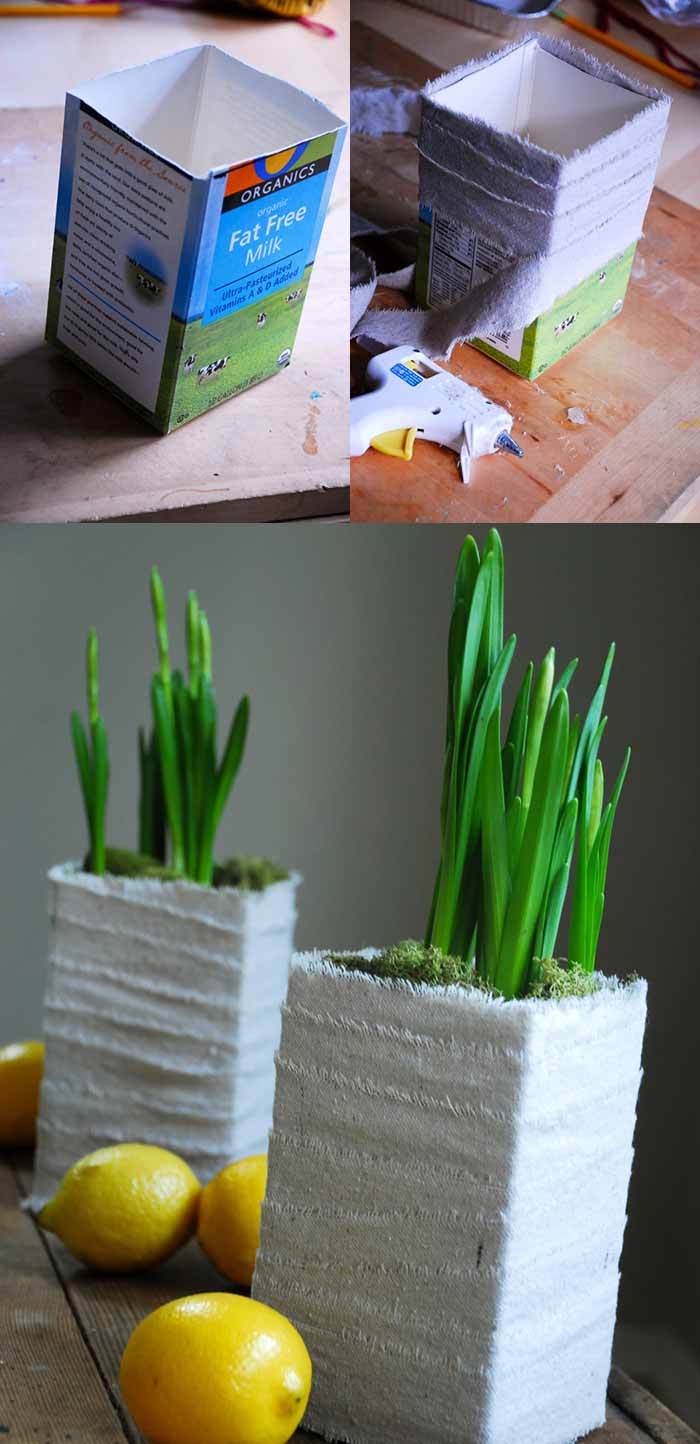
Find some empty milk cartons and clean them thoroughly. Cut off the top section of the carton using scissors or a knife. Coat the outside of the carton with a layer of glue or decoupage medium. Wrap linen or fabric around the carton, smoothing out any wrinkles. Tutorial: cfabbridesigns.com
#6 Rope-wrapped and painted terra cotta planters will bring a nautical feel:
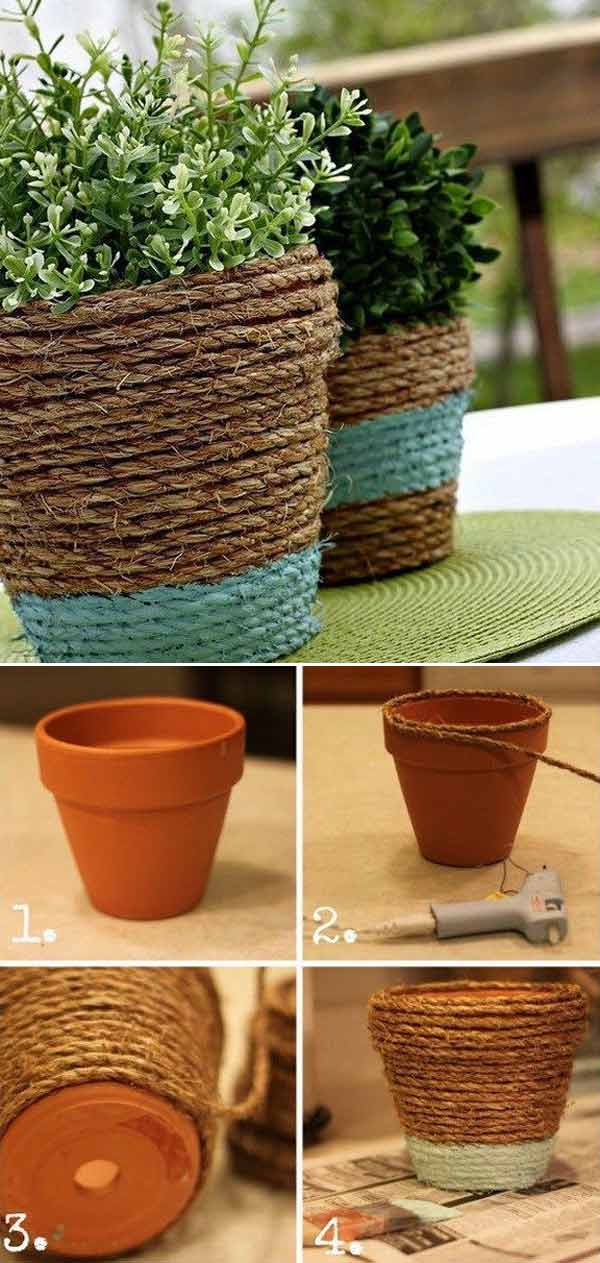
To create a nautical feel with terra cotta planters, start by thoroughly cleaning the flower pot. Next, use a hot glue gun to wrap rope tightly around the pot, ensuring it stays in place. Once the rope is secure, paint it in your desired color and allow it to dry. Finally, adorn the pot with small seashells or starfish to complete the flower pot decoration and achieve a nautical look.
See the tutorial: housebyhoff.com
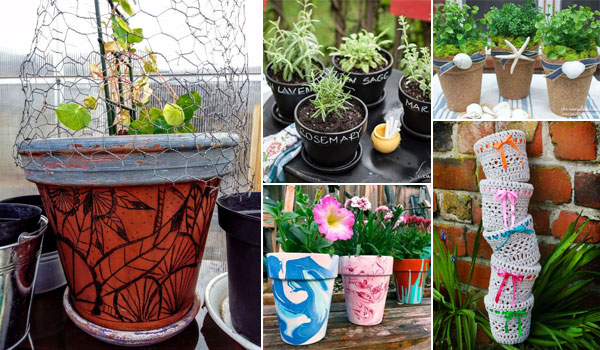
7. Cover The Flower Pots in Crochet:
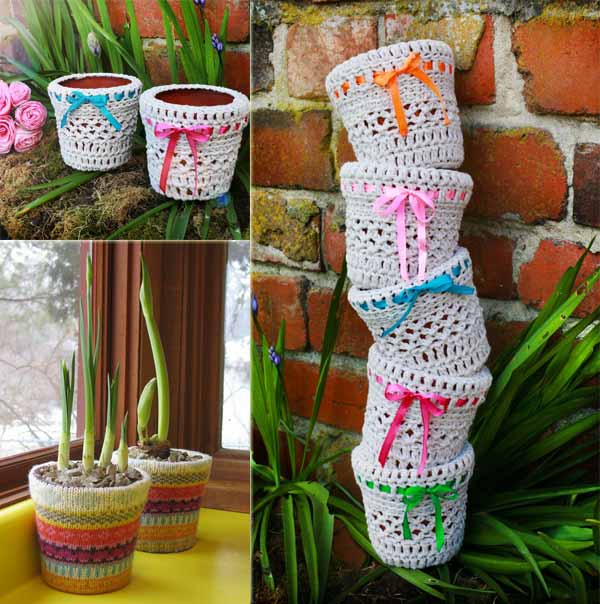
For flower pot design ideas using crochet, start by selecting your desired crochet pattern and yarn. Measure the pot’s height and circumference to determine how much yarn you need. Crochet a tube that fits the pot and add lace or ribbon trim to finish off the flower pot design.
#8 Cover the PVC pipe with Broken Tiles and China Plates to make these tall planters:
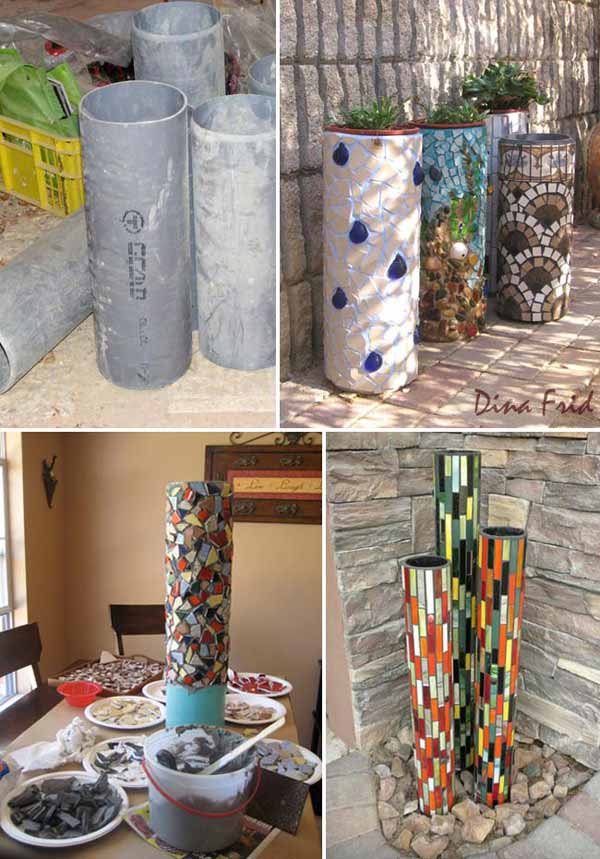
To make tall planters using broken tiles and china plates, first clean and dry the PVC pipe. Break the tiles and plates into small pieces and glue them onto the pipe using tile adhesive to create plant pot decoration ideas.
Tutorial: Fszinesotletek.blog.hu and charsgardening.com
#9 Newsprint Succulent Pots
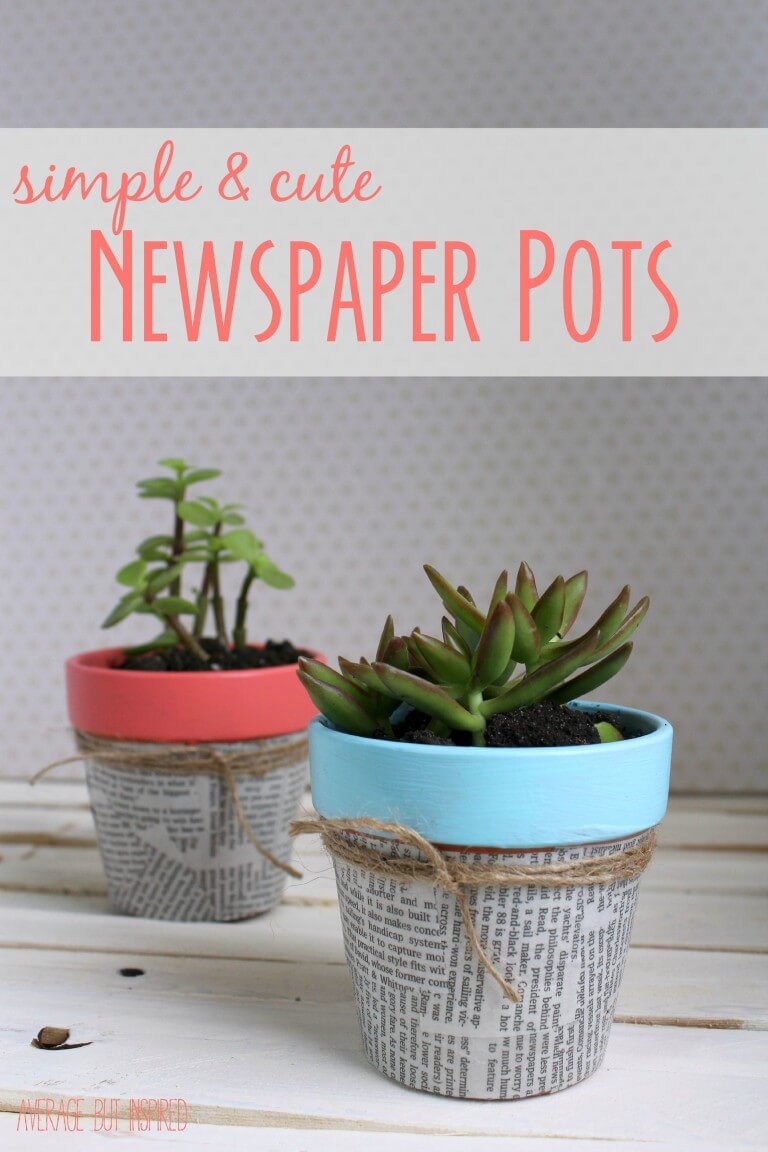
Choose an old terracotta or ceramic flower pot that you want to upcycle. Cut strips of old newspapers or magazines into small pieces. Apply a decoupage medium or white glue to the outside of the pot. Start placing the paper strips onto the pot, overlapping them slightly and smoothing them out as you go. Continue until the entire pot is covered in a layer of paper. Let the pot dry completely, then add another layer of decoupage medium or white glue on top to seal the paper. Once the second layer is dry, your new decorative pot is ready to be used! Tutorial: averageinspired.com
Related: 75 Spring Flower Arrangements That Will Make Your Home Incredibly Attractive
#10 An easy project to bring in a touch of gold here and there in your home:

For DIY gold foil lettering on flower pots, start by exploring some pot design ideas and choosing a pot as well as a phrase you would like to write on it. Cut out the phrase from a sheet of gold foil and apply it to the pot using a clear adhesive. Smooth out any air bubbles or wrinkles with a credit card. Once you have finished, allow the adhesive to dry completely before planting anything in the pot.
Tutorial: nestofposies-blog.com
#11. Give your old flower pot a bold color and decorate it with a little lace trim:
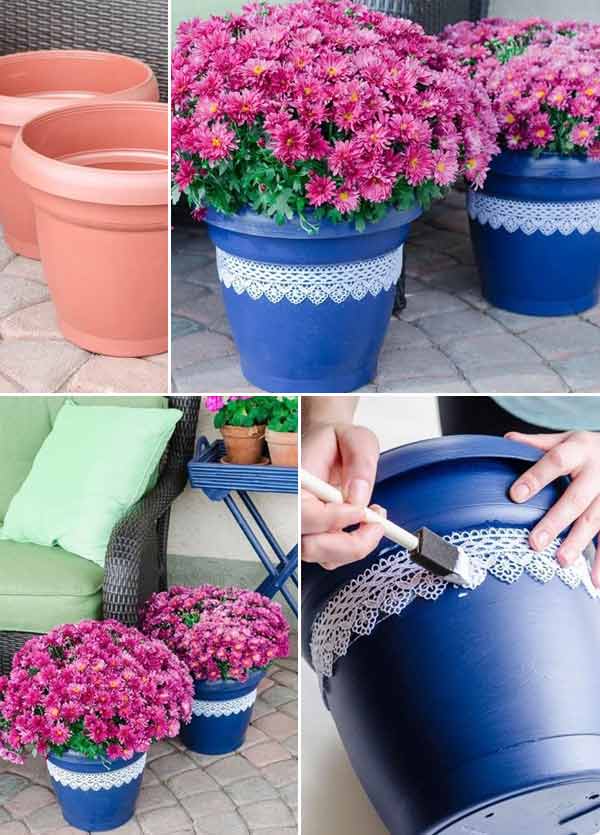
To give an old flower pot a fresh look, consider trying some flower pot decoration ideas. Start by cleaning and drying the pot, then paint it with a bold color of your choice and let it dry. Cut the lace trim to size and glue it around the rim of the pot using a strong adhesive.
more details: hometalk.com
DIY Project Details: diy-crafts-tutorials.blogspot.com
You may also like: Add Some Magic To Garden with Spilled Flower Pots
#12 Add a bit of nautical-style to your home with these Sand Covered Pots:
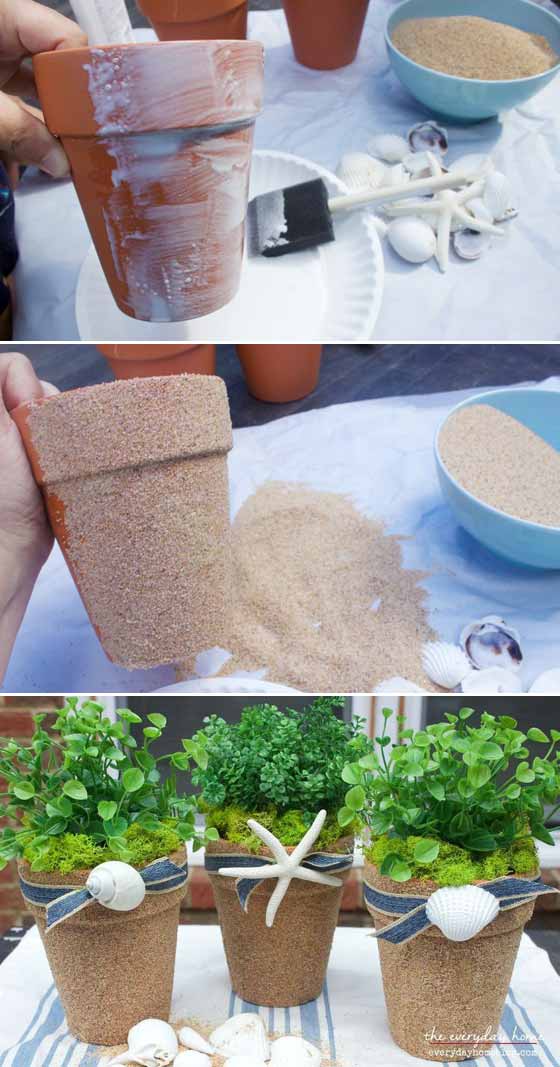
For a charming nautical-style, try out some decorative plant pot ideas by covering clean pots with waterproof adhesive and sprinkling sand on the wet paint. Once dry, add some beach-inspired plants for a pop of green.
Tutorial: everydayhomeblog.com
#13 Gild white pots in silver or gold with gilding sheets:
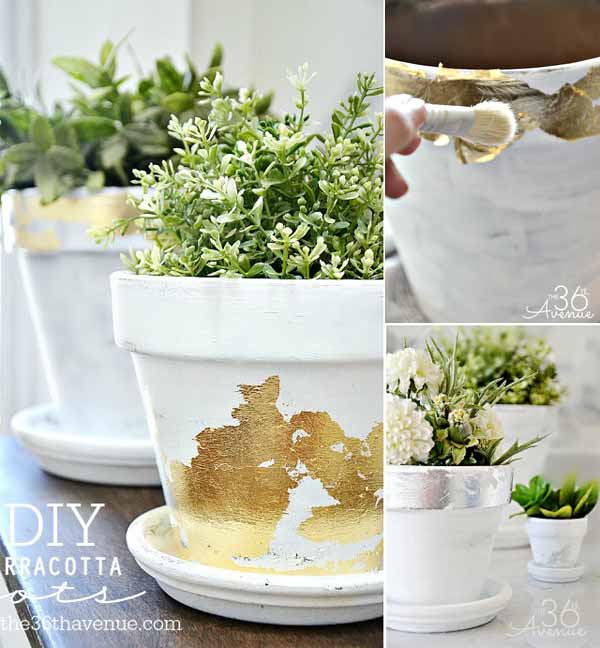
If you are looking to add some elegance to your pots, try out some pot decorations at home by gilding white pots in silver or gold. Gather gilding sheets and adhesive, then apply adhesive to the pot and place the sheet on it. Gently press the sheet onto the pot and let it dry. Once the adhesive has dried, use a soft brush to remove any excess gilding sheets.
Tutorial: the36thavenue.com
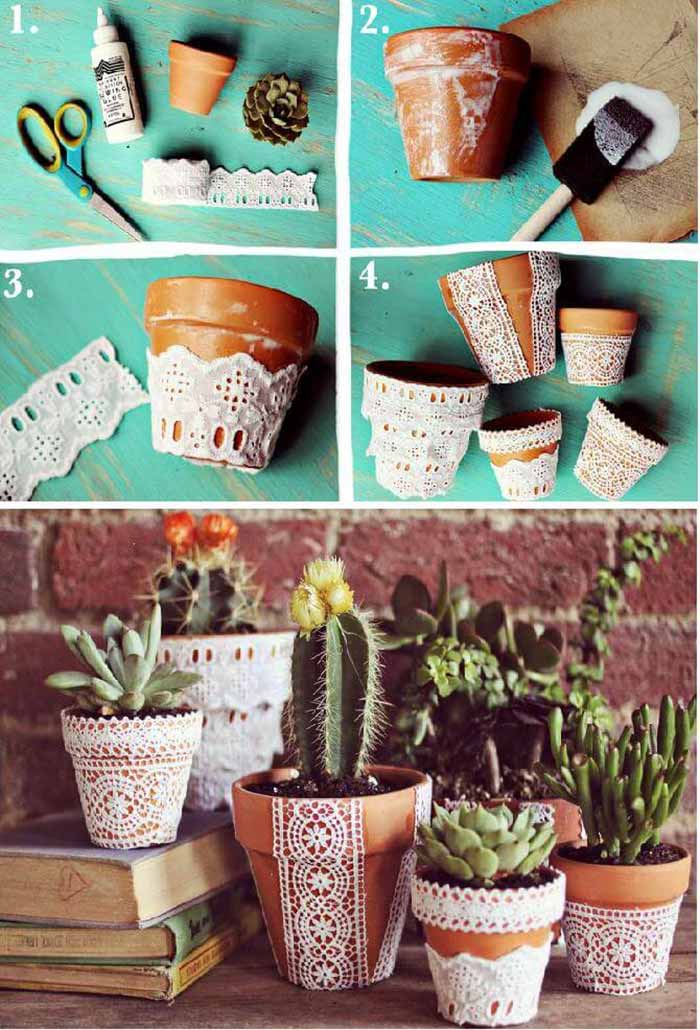
#14 Glam up some plain pots with stencils:
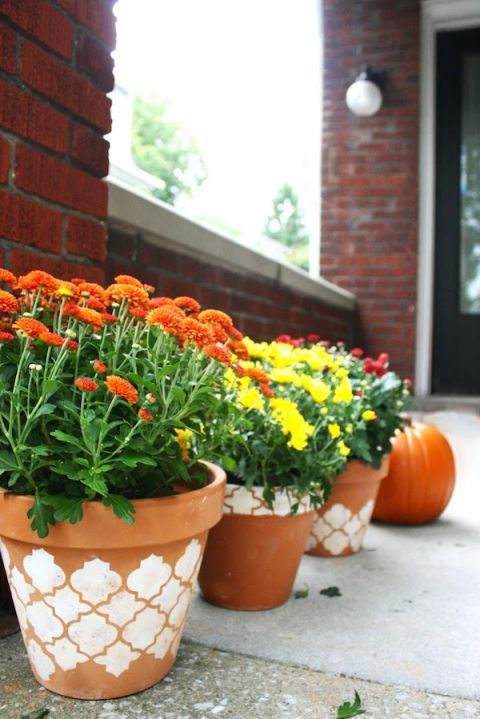
For glamming up plain pots with stencils, gather some decorative garden pots, a stencil, paint, and a foam brush. Place the stencil on the pot and use the foam brush to apply the paint inside the stencil. Remove the stencil and let the pot dry before adding any plants.
Tutorial: diycandy.com
#15 Colorful stones used for a flower pot refresh job:
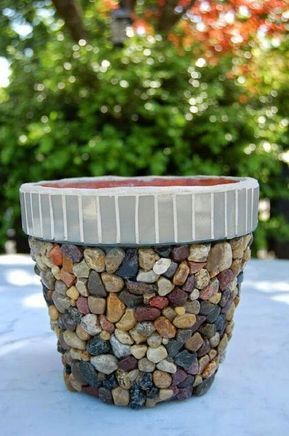
To refresh a flower pot, consider decorating flower pots with stones. Gather clean stones and adhesive, then paint the pot with a waterproof adhesive and place the stones over the wet adhesive.
#16 Make a photo flower pot as mother’s day gift:
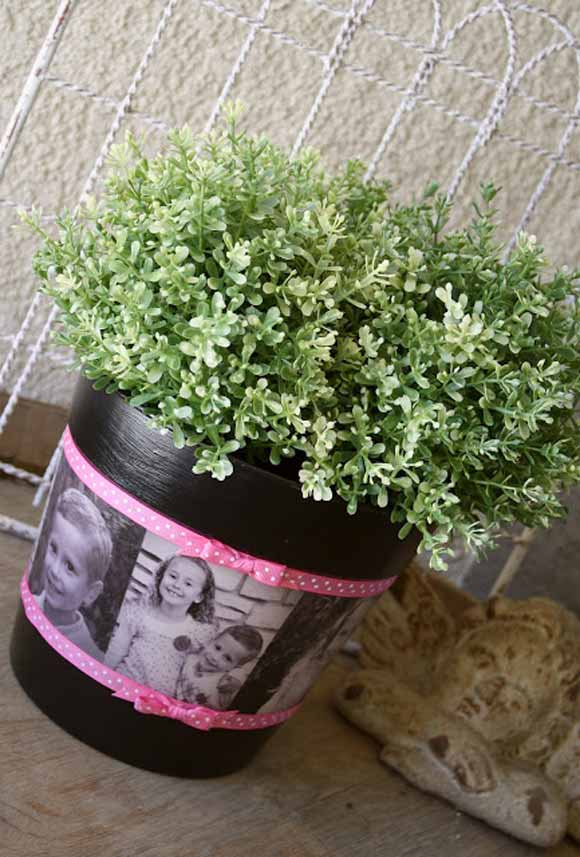
Create a personalized and heartfelt Mother’s Day gift with some ideas on how to decorate flower pot. Cut out printed photos and place them onto clear adhesive paper. Stick the paper onto the pot, then fill it with soil and add your mom’s favorite plant.
Tutorial: adiamondinthestuff.com
#17 Warm your space with these cheerful fabric covered pots:
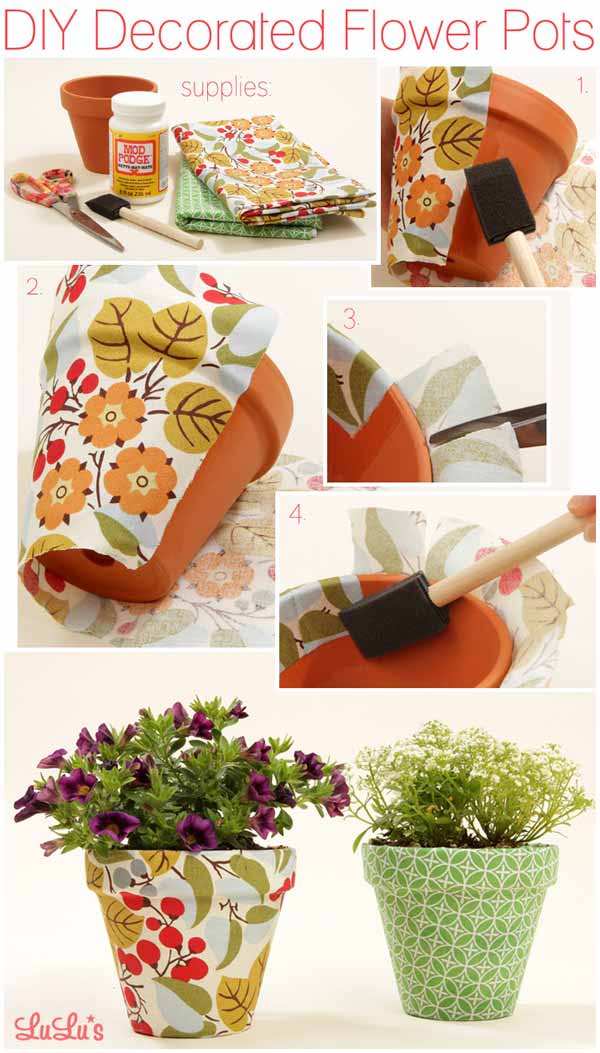
For some flower pot decoration ideas at home, try fabric-covered pots. Cut a piece of fabric to the size of the pot, leaving extra fabric to fold over the edges. Paint a layer of glue over the pot and wrap the fabric around it, folding the extra fabric over the edges. Allow it to dry and add some cute plants.
Tutorial: lulus.com
#18 Coat your flower pots in chalkboard paint and you can write any words you want:
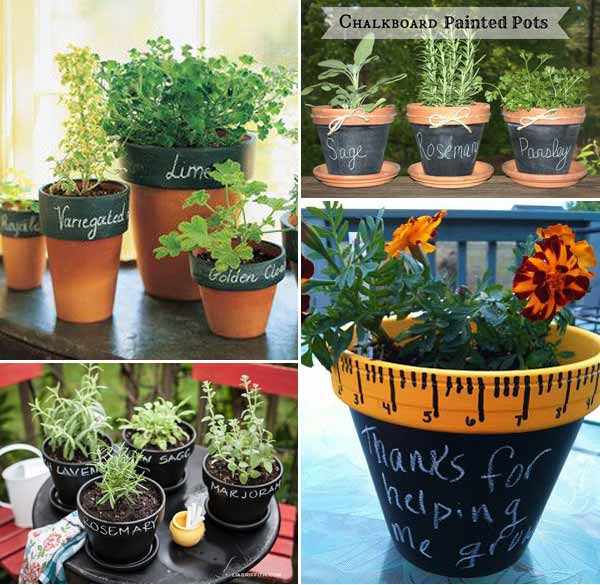
For some ideas on how to decorate plastic plant pots, apply chalkboard paint to your pot, wait for it to dry, and use chalk to write your desired words or phrases. You can change it whenever you like for a fun and customizable look.
Tutorial: awalkinmyflipflops.com
#19 Create a Dripping Effect with Painted Flower Pots:
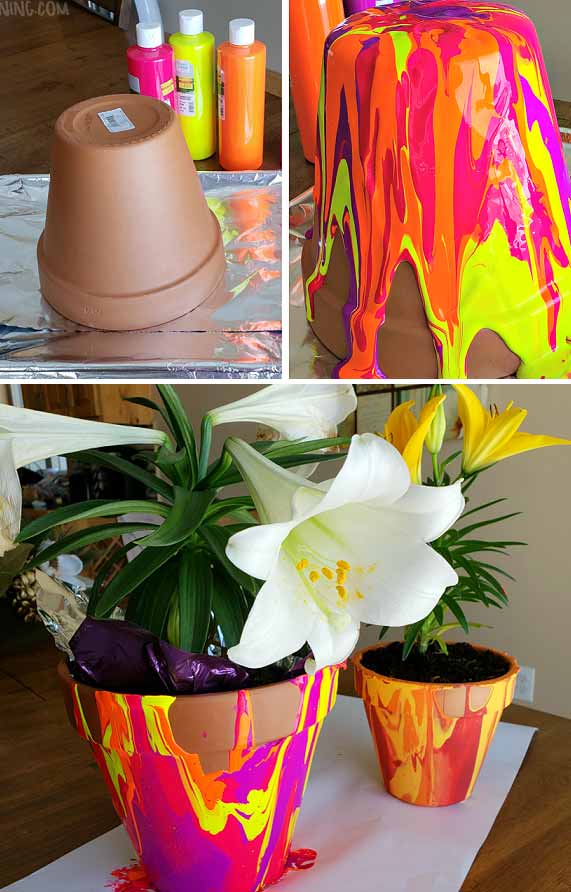
For decorated pots with a unique look, try dripping paint from the top of the pot using a paintbrush, then slowly rotate the pot to create a dripping effect. Once dry, add some beautiful flowers or plants to complete the look.
More details: craftymorning.com
#20 Use a crayon to draw the patterns you want:
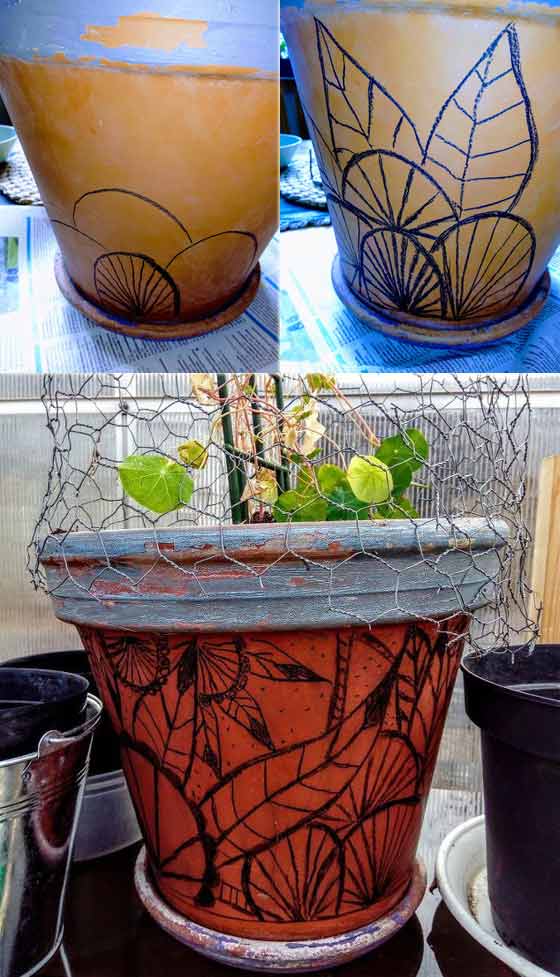
Draw your desired pattern onto the pot using a crayon, then paint over it with a contrasting color. The crayon will resist the paint and reveal the pattern once it dries. Add a coat of sealant to preserve the design.
#21 Decorate Pots With Preserved Moss:
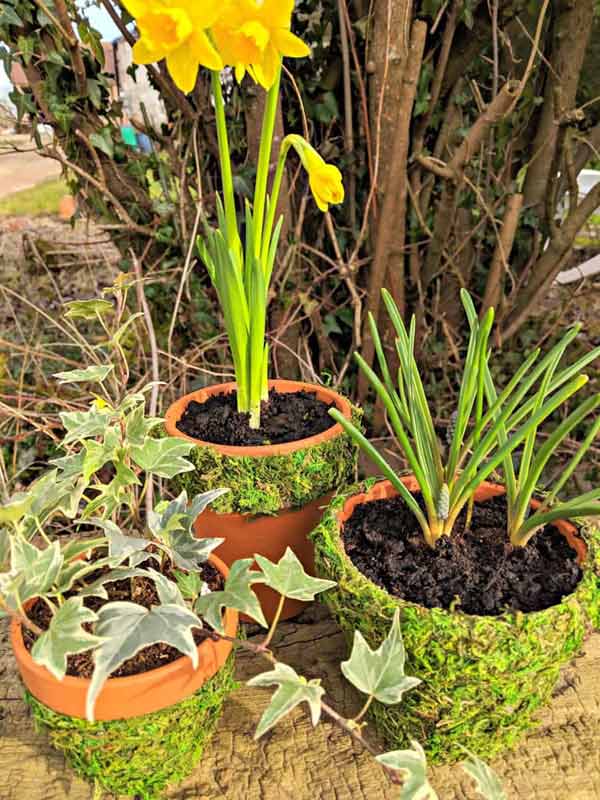
Apply a layer of adhesive to your pot and press preserved moss onto the adhesive, covering the pot with a layer of moss. Allow it to dry and add some natural-looking plants for a beautiful woodland-inspired look.
22. Upcycled Denim Planters

Old denim jeans don’t have to end up in the trash—turn them into stylish flower pots instead. The sturdy texture and classic blue tones of denim bring a cozy, rustic vibe to any space. Whether used on a patio, balcony, or indoor shelf, these planters add character while keeping fabric waste out of landfills. Plus, they’re a fantastic way to showcase sustainability through design.
23. DIY Color Stick Flower Pots
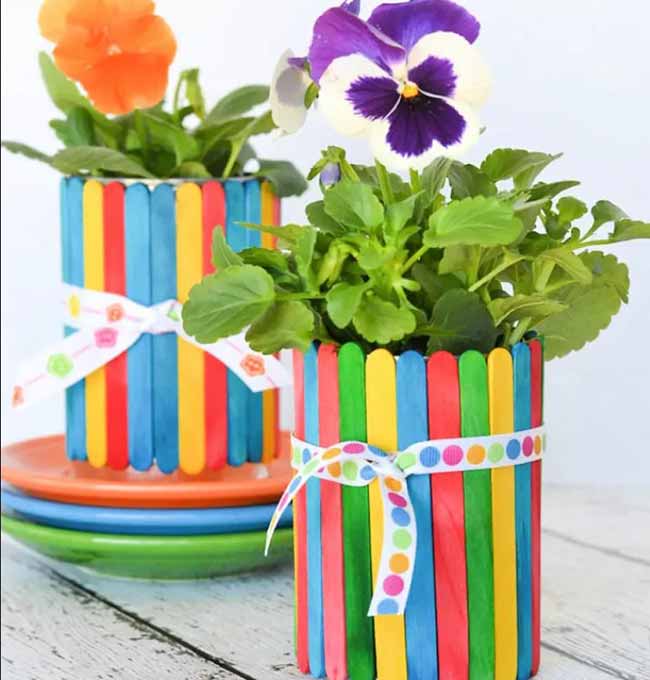
Looking to add a pop of color to your plant pots? Try covering them with painted wooden sticks or popsicle sticks! This cheerful DIY is perfect for kids and adults alike. It’s an easy way to give plain containers a vibrant makeover—full of texture, color, and personality. Whether placed on a windowsill or in the garden, these playful pots are guaranteed to stand out. Tutorial
24 Turn Tin Cans into Elegant Faux Ming Vases: A DIY Guide to Oriental-Style Flower Pots
There’s something timeless about blue and white Oriental pottery. Drawing inspiration from classic Chinese porcelain, this creative project breathes new life into ordinary tin cans—transforming them into stylish, Ming-style flower pots. With just a few materials and simple steps, these upcycled planters add a touch of cultural charm to any garden or interior space.
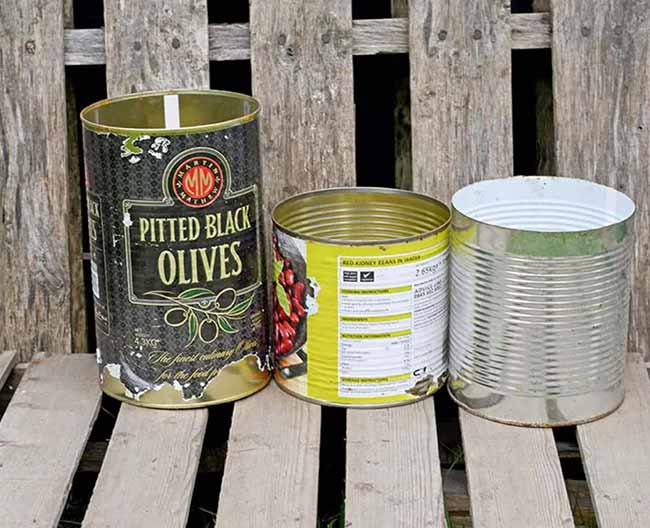
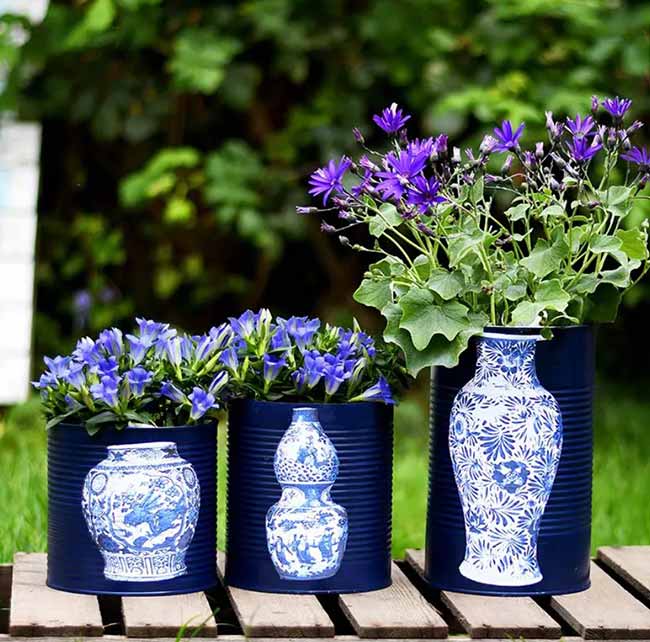
This tutorial is a great way to repurpose leftover food cans into beautiful decor pieces, ideal for displaying flowers—especially those with blue hues that complement the design. The end result is a unique fusion of craft and tradition, perfect for both indoor and outdoor settings. Source
Materials Needed
-
Large empty food tin cans (various sizes)
-
Blue spray paint (e.g., Montana Gold in “Blue Note”)
-
Mod Podge decoupage glue
-
Foam brush
-
Acrylic varnish spray
-
Lightweight paper
-
Printable blue-and-white Ming vase templates (custom or from sources like the Painted Hive blog)
Step-by-Step Instructions
Step 1: Prep the Cans
Remove any labels from the tin cans and clean thoroughly. Once dry, spray paint each can with blue paint. Let them dry completely before moving to the next step.
Step 2: Print the Designs
Download and print the Ming-style vase templates. Adjust the print size if needed to match the dimensions of the cans. Use lightweight paper for easier application during decoupage.
Step 3: Cut Out the Art
Carefully cut out each vase design from the printed sheet. Precision helps maintain the traditional look of the artwork.
Step 4: Apply the Images
Using a foam brush, apply a generous layer of Mod Podge glue to the back of the cutout. Adhere the image to the front of the painted tin can. Repeat for all cans.
Step 5: Seal the Artwork
To protect the design, seal the can with an acrylic varnish spray. This step is especially important if the artwork was printed using an inkjet printer, as Mod Podge alone may cause smudging. For laser prints, sealing can also be done with another layer of Mod Podge—preferably a waterproof version if the pots will be used outdoors.
Step 6: Add Plants
Fill the cans with a drainage layer—such as pebbles or broken terracotta pieces—before adding soil and flowers. Blue-toned flowers are especially striking against the blue-and-white porcelain aesthetic.
Tips & Ideas
-
These faux Ming vases can serve as thoughtful handmade gifts or eye-catching pieces at events.
-
Experiment with different shapes and sizes of cans for a dynamic display.
-
For indoor use, pair with matching Chinoiserie or Oriental-themed decor for a cohesive look.